My first day at Puppet, James Turnbull sat me down next to Jeff McCune and
waited for things to happen. That was partly because he knew that Jeff’s
attention to detail would offset my attention to git commit -a -m 'blkajdfs',
and partly because there were about 30 of us in the office and we all had shit
to do. Jeff was kinda working on an MCollective module back then, and I had
been using it pretty heavily at the school, so I decided to jump right in and
start hacking it up. To make a long story short, that experience working on the
MCollective module resulted in:
An understanding in how to use git as something more than just glorified rsync
An “Odd Couple” friendship with a guy who has “right foot” and “left foot” socks
Over the next 4 years I would keep going back to Jeff whenever something new
puzzled me, and he would keep giving me pointers that directed me down the
right path. I learned about Pry from Jeff when
I was working on the directoryservice provider and couldn’t figure out why my
variables had no value, my understanding on the principles of unit testing came
from completely screwing up spec tests, and my blog posts on type/provider
development never would have happened if I didn’t make all those mistakes and
have someone help me learn from them. So when I hit that point at Puppet where
I began thinking about moving on to “the next big thing,” Jeff was a natural
choice.
With that in mind, I’m happy to announce that as of September 7th, 2017 I’ll be
joining Jeff at openinfrastructure.co where we’ll be
available to consult on everything from DevOps practices, Puppet
deployments/module development/etc, and “how you turn ordinary socks into
‘right foot socks’ and ‘left foot socks.’” (I’m MOSTLY kidding on the last bit,
but that’s not my area of expertise, soooo…..)
It’s been 6.5 years of consulting with Puppet Inc. and I’m not planning on
stopping anytime soon. I’m grateful for all the opportunities and experiences
that have come my way, and I’m looking forward to going back to a smaller work
environment and more freedom to choose those opportunities! If you have one of
those opportunities and are looking for someone to help you out,
please look us up at
http://www.openinfrastructure.co and let us
know about it!
The subject that generates the most questions for me from the Puppet community
is Hiera. Not only do people want to know
what it is (a data lookup tool) and how to spell it (I before E except after
C), but even saying the word causes problems (It’s HIGH-rah — two syllables,
with the accent on the first).
I get so many questions about Hiera because it’s a tool for storing and
accessing site-specific data, and it’s actually this problem of accessing data
within reusable code that most people are trying to solve. Many people think
the ONLY place data can live is within Hiera, but that’s not always the case
(as we will see later with profiles). To help with these problems, I’ve
identified all the ways that data can be expressed within Puppet, listed the
pros and cons of each, and made recommendations as to when each method should
be used.
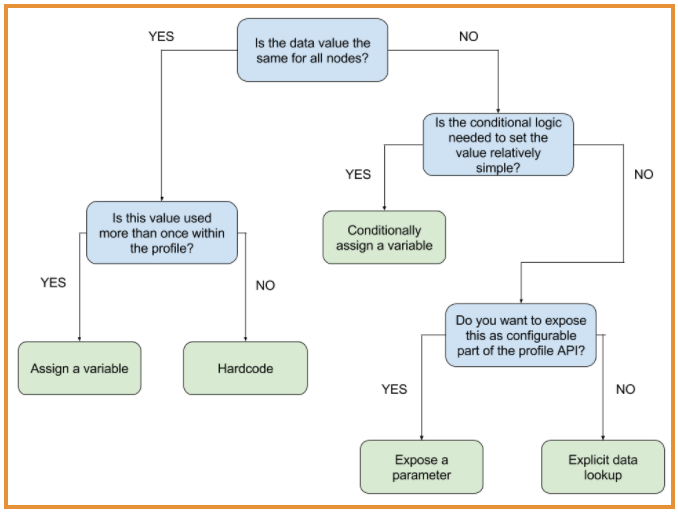
For those people who are visual learners, here’s a simplified flow chart below,
detailing the choices you need to make when deciding how to express your
configuration data.
What is data and what is code?
This issue of what constitutes data is the first wrinkle in devising what I
call a data escalation path. For background reading, the Puppet docs page
on roles and profiles does
a great job of describing the difference between a component module and a
profile.
To quickly summarize: A component module is a general-purpose module designed
to model the configuration of a piece of technology (e.g., Apache, Tomcat or
ntpd), and a profile is an organization-specific Puppet module that describes
an organization’s implementation of a piece of technology. (We also use the
term “site-specific” to refer to an organization’s own particular data.)
For example, an Apache profile that an organization creates for itself might
use the official Puppet Apache
module to install and configure
Apache. But the profile might also contain resources for an organization’s SSL
certificates or credentials, layered on top of the configuration provided by
the Puppet Apache module. The resource(s) modeling the SSL certificate(s) are
necessary only for that particular organization, which is why they don’t
show up in the official Puppet Apache module.
In this example, the official Puppet Apache module itself represents the code,
or the generic and reusable aspect of the configuration (as any good component
module would). The profile contains the organizational (or site-specific) data
that is fed to the component module (or code) when that module is used. This
separation — and the fact that data can be represented within the same
constructs used to represent code — is frequently a source of confusion or
frustration for new Puppet users (and especially for users with a background in
object-oriented programming, which is almost antithetical to the
declarative approach
that is core to Puppet).
Data within a profile can come in different forms:
With the above items all considered to be data, which option do you choose?
It’s this question that the data escalation path will answer.
NOTE: This post specifically covers data escalation paths within profiles,
and NOT within component modules. Unless explicitly noted, assume that
recommendations apply ONLY to profiles, and not component modules (since
profiles represent site-specific data).
Why an escalation path?
The decisions you make when writing Puppet manifests will seldom be plain and
obvious. Instead of focusing on whether something is in the right place, it’s
better to think about the ways that complexity can help you solve problems.
You can absolutely put everything you would consider data inside Hiera, and
that would immediately provide you a way to handle most use cases. But the
legibility of your Puppet manifest suffers when you have to jump back to Hiera
every time you need to retrieve or debug a data value (which is a very
labor-intensive thing to do if you don’t have direct access to the Puppet
masters). Plus, things like resource dependencies are particularly hard to
model in Hiera data, as opposed to using resource declarations within a class.
For simpler use cases, putting data into Hiera isn’t necessary. But once you
reach a certain level of complexity, Hiera becomes extremely useful. I’m going
to define those “certain levels of complexity” explicitly here, as well as both
the pros and the cons for each method of expressing data within your profiles.
Hardcoding variables
The term “hardcoding” is wrapped in quotes here because traditionally the term
has negative connotations. When I refer to hardcoding, I’m talking about
directly editing an item within a Puppet manifest, without assigning a
variable. In the example below, if you opened up the Puppet manifest and
changed the owner from ‘root’ to ‘puppet’, that would be considered hardcoding
the value:
Hardcoding has a negative connotation because typically, when someone would
hardcode a value in a script, it represented a workaround where a data item is
injected into the code — and mixing data and code means that your code is no
longer as generic and extensible as it once was.
That concern is still valid for Puppet: If you open up the official Puppet
Apache module and change or add a site-specific value within that component
module, then you ARE, in fact, mixing data with code. If instead you edit the
Apache profile for your organization and change a value in that profile, then
you’re changing site-specific data in something that is already considered
site-specific. The difference is that the official Puppet Apache module is
designed to be extensible, and used where necessary, while the profile is meant
to be used only by your own organization (or site, or group).
Hardcoding a value is the easiest method to understand: Something that was
previously set to one value is now set to another value. It’s also the easiest
change to implement — you simply change the value and move along. If done
correctly, someone could change the value without needing to understand the
Puppet DSL (domain specific language — i.e. the rules governing Puppet code in
a Puppet manifest). Finally, because it’s simply text, a hardcoded value cannot
be overridden, and the value is exactly the same for all nodes.
Pros
The easiest technique to understand: Something was changed from one value to another.
The easiest change to implement.
Cons
If you hardcode the same value in multiple places, then changing that value requires multiple individual changes.
Recommendations
You should hardcode a value when:
The value applies to EVERY NODE being managed by Puppet.
The value occurs once. If it occurs more than once within a manifest, use a variable instead.
Assigning a variable
The next logical step after hardcoding a value is to assign a variable within a
Puppet manifest. Assigning a variable is useful when a value is going to be
used in more than one place within a manifest. Because variables within the
Puppet DSL cannot be reassigned, and because variables within a manifest cannot
be assigned or changed by Hiera, variables are considered private to the
implementation. This means they can be changed only by users with permission to
change Puppet manifests, not by people who are responsible for using the
console to pass data to the code written by manifest authors. So variables
really assist writers of Puppet code more than they assist consumers of Puppet
code.
Anytime there’s a data value that will be expressed more than once within a
Puppet manifest, it’s recommended that you use a variable. In the future, if
that value needs to be changed, all you need to do is change the variable’s
value, and it will be updated wherever the variable was used. Below is an
example of that concept in action:
Assigning a variable provides a single point within a manifest where data can be assigned or changed.
Assigning a variable within the DSL makes it visible to anyone reviewing the Puppet manifest. This means you don’t need to flip back and forth between Hiera and Puppet to look up data values.
Cons
The value applies to EVERYONE — it must be changed if a different value is desired, and that change applies to everyone.
No ability to override a value.
Recommendations
You should assign a variable when:
The data value shows up more than once within a manifest.
The data value applies to EVERY node.
Conditionally assigning a variable
In the previous section on assigning a variable, I recommend that variables be
used only when their value applies to EVERY node. But there is a way to work
around this: conditional statements.
Conditional statements in the Puppet DSL (such as if, unless, case, and
the selector operator) allow you to assign a variable once, but assign it
differently based on a specific condition. Using the previous example of
Puppet’s configuration directory, let’s see how that would be assigned
differently, based on the system’s kernel fact:
Conditionally assigning a variable has its own section because when people
think about the choices they have for expressing data within Puppet, they
usually think of Hiera. Hiera is an excellent tool for conditionally assigning
a value, based on its internal hierarchy. But what if the conditional logic you
need to use doesn’t follow Hiera’s configured hierarchy? Your choices are to:
Edit Hiera’s hierarchy to add the logic you need (which is potentially a
disruptive change to Hiera that will affect lookups), or Use conditional logic
within the DSL.
Since we’re talking about an escalation path, conditionally assigning a
variable is the next logical progression when complexity arises.
Pros
Values can be assigned based on whatever conditional logic is necessary.
Values are assigned within the Puppet DSL, and thus are more visible to Puppet code reviewers (versus reviewing Hiera data, which may be located elsewhere).
Reusability remains intact: The variable is assigned once, and used throughout the manifest.
Cons
Variables still cannot be reassigned or overridden.
Conditional logic can grow to become stringy and overly complex if left unchecked.
Conditional logic is syntax-heavy, and requires knowledge of the Puppet DSL (i.e., it’s not something easily used by people who don’t know Puppet).
Recommendations
You should use conditional logic to assign a value within a profile when:
The conditional logic isn’t overly complex.
The conditional logic is different from the Hiera hierarchy.
Visibility of the data value within the Puppet DSL is a priority.
Hiera lookups and class parameters
Puppet’s data lookup tool is Hiera, and Hiera is an excellent way to model data
in a hierarchical manner based on layers of business logic. Demonstrating how
Hiera works is the easy part; implementing it (and knowing when to do Hiera
calls) is another story.
Before we get there, it’s important to understand that Hiera lookups can be
done ad hoc through the use of the hiera() or lookup() functions,
or through the automatic class parameter lookup functionality. The
previous links will give you detailed explanations. Briefly, if a class is
declared and a value is not explicitly assigned for any of the class’s
parameters, Hiera will automatically do a lookup for the full parameter name.
For example, if the class is called ‘apache’ and the parameter is called
‘port’, then Hiera does an automatic parameter lookup for apache::port.
We’ll get back to automatic parameter lookups in a second, but for now let’s
focus on explicit lookups. Here’s an example using both the older hiera
function and the newer lookup function:
Explicit lookups using one of the above functions are easier to see and
understand when you’re new to Puppet, because the automatic parameter
lookup functionality is relatively hidden to you (should you not be aware
of its existence). More importantly, explicit lookups within a Puppet class are
considered to be private to that class. By “private,” I mean the
object-oriented programming definition: The data is limited in scope to this
implementation, and there’s no other external way to override or affect this
value, short of changing what value Hiera ends up returning. You can’t, for
example, pass in a parameter and have it take precedence over an explicit
lookup — the result of the lookup stands alone.
More than anything, the determining factor for whether you use an explicit
lookup or expose a class parameter to the profile should be whether the Hiera
lookup is merely a shorthand for getting a value that others SHOULDN’T be able
to change, or whether this value should be exposed to the profile as part of
the API. If you don’t want people to be able to override this value outside of
Hiera, then an explicit lookup is the correct choice.
Explicit lookup pros
No need for conditional logic since Hiera is configured independently. Simply do a lookup for a value, and assign it to a variable.
Using a lookup function is a visible indicator that the data lives outside the DSL (in Hiera).
Explicit lookup cons
Loss of visibility: The data is inside Hiera’s hierarchy, and determining the value requires invoking Hiera in some manner (as opposed to simply observing a value in the DSL).
If the lookup you want to perform doesn’t conform to Hiera’s existing hierarchy, then Hiera’s hierarchy will need to be changed, which is disruptive.
Explicit lookup recommendations
You should use an explicit data lookup when:
The data item is private to the implementation of the class (i.e., not exposed as an API to the profile).
The value from Hiera should not be overridden within the Puppet DSL.
Class parameters
API vs. internal logic
When building a profile, the implementation of the profile (i.e., anything
between the open and closing curly braces {} of a class definition: class
apache { … } ) is considered to be private. This means that there really are
no guarantees around specific resource declarations as long as the technology
is configured properly in the end. Class parameters are considered to be part
of the profile’s API, and thus there’s a guarantee that existing parameters
won’t be removed or have their functionality changed within a major release (if
you follow semantic versioning).
More specifically, exposing a parameter indicates to your Puppet code users
that this is something that can be set or changed. Think of computer hardware
and the differentiation between Phillips head screws and Torx screws. The
Phillips head screws usually mean that customer intervention is allowed, much
the same way that parameters indicate data values that can be changed, while
Torx screws usually mean that customer intervention is disallowed, much the
same way as variables or explicit lookups within a profile cannot be reassigned
or overridden.
Puppet performs a Hiera lookup in the style of (CLASS NAME)::(PARAMETER NAME).
The default value set in the class definition.
By exposing a class parameter to your profile, you allow for the data to be
entered into Hiera without needing an explicit lookup in the profile.
Additionally, class parameters can be specified during a resource-like class
declaration that allows the user to override the Hiera lookup layer and pass in
their desired value. The user understands that class parameters are Puppet’s
way of allowing input and altering the way Puppet configures the piece of
technology. In this way, class parameters aren’t merely another method for
performing a Hiera lookup; they’re also an invitation for user input.
Discoverability and extensibility
One important distinction with class parameters: The Puppet Enterprise console
is able to discover class parameters and present them visually. It can do this
because Puppet Server has an API that exposes this data, and that
means parameters and classes can be queried and enumerated. Explicit Hiera
lookups are not discoverable in the same way; you will need to search through
your codebase manually.
Next, class parameters can have their values assigned by an external node
classifier, or ENC, but explicit Hiera lookups cannot. An ENC is an arbitrary
script or application that can tell Puppet which classes a node should have.
(For more information, refer to this document on ENCs.) For Puppet
Enterprise, the Puppet Enterprise console acts as an ENC.
Finally, consider the extensibility of explicit lookups versus class
parameters. Puppet introduced the lookup() function a while back as a
replacement for the hiera() function, which means that over time, all
hiera() function calls will need to be converted to lookup() function
calls. Class parameters have remained largely unchanged since their
introduction (with data types being an additional change), so
people using class parameters and the automatic parameter lookup don’t need to
convert all those explicit lookups. In this case, explicit lookups may require
more work than class parameters when performing an upgrade.
Because these two lookups have two fundamentally different purposes, I’m
treating their usages separately.
Class parameter lookup pros
Signals to users of Puppet code that this data item is configurable.
Allows the value to be assigned either by the Puppet Enterprise console (or other configured ENC) or Hiera.
Classes and parameters are discoverable through the Puppet Server API.
Class parameter lookup cons
Automatic parameter lookup is unexpected if you don’t know it exists.
Loss of visibility: The data is inside Hiera’s hierarchy, and determining the value requires invoking Hiera in some manner (as opposed to simply observing a value in the DSL).
Each parameter is unique, so even if multiple profiles expose a parameter of the same name that requires the same value, there needs to be a value in Hiera for each unique parameter.
Class parameter recommendations
You should expose a class parameter when:
You require the conditional logic within Hiera’s hierarchy to determine the value of a data item.
If or when you need to override the value using the Puppet Enterprise console (or other configured ENC).
To indicate that this part of the profile is configurable to users of Puppet code.
Summary
Writing extensible code and keeping configuration data separate are always in
the back of every Puppet user’s mind, but the mechanics of how to achieve this
goal can seem daunting. With this post, I hope you now have a clearer path for
structuring your Puppet code!
In the past, the thing that got me to make a blog post was answering a question
more than once and not having a good source to point someone to after-the-fact.
As the docs at docs.puppet.com have become more
comprehensive, I find that I’m wanting to write about things infrequently. But,
all it takes is a question or two from a customer to kick things in the
ass and remind me that there’s still a LOT of tribal knowledge around Puppet
(let alone the greater community). It’s with THAT theme that we talk about
Roles & Profiles, and the Control Repo.
Like many things nowadays, there are official Puppet docs on the Control Repo.
In a nutshell, the Control Repo is the repository that Puppet’s Code Manager
(or R10k in the open source) uses to track Puppet Environments and the versions
of all Puppet modules within each Puppet Environment. On a greater scale, the
Control Repo is an organization’s implementation of Puppet to the extent that
it can (and eventually will) fully represent your organization’s
infrastructure. Changes to the Control Repo WILL incur changes to your Puppet
Master(s), and in most cases will also bubble down to your managed nodes
(i.e. if you’re changing a profile that’s being used by 1000 nodes, then that
change will be definitely change the file that’s on each Puppet Master but will
also change the enforcement of Puppet on those 1000 nodes).
Similarly, Roles & Profiles has its own official docs page!
As a recap, “Role & Profiles” is a design pattern (that’s all!) that has been
employed by Puppet Users for several years as a way to make sense of wiring
up public Puppet modules with site-specific implementations and data. It allows
organizations to share common modules while also having the ability to add their
own customizations and implement a separate configuration management data layer
(i.e. Hiera).
Both the Control Repo and Roles & Profiles (R&P) have undergone several evolutions to
get them to the reliable state we know today, and they’ve had their shared
history: we’ve implemented Roles & Profiles both inside and outside the Control Repo…
Roles and Profiles outside the Control Repo
Roles & Profiles were (was?) created before the Control Repo because the problem of
disentangling data from Puppet code was a greater priority than automating
code-consistency across multiple Puppet masters. When the idea of using a git
repo to implement dynamic Puppet Environments came along, the success of
being able to ensure module consistency across all your masters was pretty
landmark. The workflow, however, needed some work – there were a LOT of steps.
Git workflow automation loves it some hooks, and so the idea of a post-receive hook
that would immediately update a Puppet environment was a logical landing point.
The idea was that all modules would be listed and ‘pinned’ to their correct
version/tag/commit within Puppetfile that lived at the root of the Control
Repo. ‘Roles’ and ‘Profiles’ are Puppet modules, modules were already listed
in Puppetfile, so some customers listed them there initially. During a code
deploy, R10k/Code Manager would read that file, pull down all the modules at their
correct versions, and then move along. That entire workflow looked like this:
Create/Modify a Profile and push changes to the Profile module repo
Create a branch to the Control Repo and modify Puppetfile to target the new Profile changes
Push the Control Repo changes up to the remote (where the git webhook catches that change and deploys it to Puppet Masters)
Classify your node (if needed) and/or test the changes
If changes are necessary, go back to step 1 and repeat up to step 4
Once everything works, submit a Pull Request to the Control Repo
This workflow works regardless of whether a Role or Profile was changed, but
the biggest thing to understand is that ONLY the Control Repo has the git webhook
that will deploy code changes to your Puppet Masters, so if you want to trigger
a code deploy then you’ll need to change the Control Repo and push that change
up (or have access to trigger R10k/Code Manager on the Puppet Master). This
resulted in a lot of ‘dummy’ changes that were necessary SOLELY to trigger a
code change. Conversely, changes to the Roles or Profiles module (they’re separate)
don’t get automatically replicated, so even if there’s a small change to a
Profile you’ll still need to either trigger R10k/Code Manager by hand or make
a small dummy commit to the Control Repo to trigger a code deploy.
As I said before, some customers implemented Roles & Profiles and the Control Repo
this way for awhile until it was realized that you could save steps by putting
both the Roles and Profiles module into the Control Repo itself…
Roles and Profiles inside the Control Repo
Since the entire contents of the Control Repo are already cloned down to disk by
R10k/Code Manager, the idea came about to store the Roles and Profiles modules
in a special directory of the Control Repo (usually called ‘site’ which is short
for ‘site-specific modules’), and then change $modulepath within Puppet to
look for the ‘site’ folder within every Puppet Environment’s directory path as
another place for Puppet modules to live. This worked for two reasons:
It shortened the workflow (since changes to Roles and Profiles were done
within the history of the Control Repo, there was no need to change the
version ‘pin’ inside Puppetfile as a separate step)
Because Roles and Profiles are now within the Control Repo, changes made to
Roles and Profiles will now trigger a code deploy
For the vast majority of customers, putting Roles & Profiles inside the Control
Repo made sense and kept the workflow shorter than it was before. It also had
the added benefit of turning the Control Repo into the important artifact that
it is today (thanks to the git webhook).
Can/Should we also put other modules inside the Control Repo?
Once you add the site directory to $modulepath, it opens up that directory to
be used as a place for storing ANY Puppet modules. The question then remains:
should the site directory be used for anything else other than Roles and Profiles?
Maybe?
Just like Puppet, though, just because you CAN do things, doesn’t immediately
mean you SHOULD. It’s important to understand that the Control Repo is
fundamental to ensuring code consistency across multiple Puppet Masters. For
that reason, commits to the Control Repo should be scruitinized closely. If
you’re a large team with many Puppet contributers and many Puppet masters, then
it’s best to keep modules within their own git repositories so multiple team
members can work independenly and the Control Repo can be used to “tie it all
together” in the end. If you’re the only Puppet contributor, you’re using 80%
of your modules from the Puppet Forge, but you have 3 relatively-static modules
outside of Roles and Profiles that you’ve written specifically for your
organization and you want them in the site directory of the Control Repo then
you’re probably fine. See the difference?
Who owns what?
One of the biggest factors to influence where Puppet modules should be managed
is the split of which teams own which decisions. Usually, Puppet infrastructure
is owned by an internal operations team, which means that the Ops team is used
to making changes to the Control Repo. If Puppet usage is wide enough within
your organization it’s common to find application teams who own specific
Profiles that are separate from the infrastructure. It’s usually easier to
grant an outside team access to a separate repo than it is to try and restrict
access to a specific folder or even branch of an existing repository, and so
in that case it might make sense to make the Profile module its own repository.
If the people that own the Puppet infrastructure are the same people that
make changes to Puppet modules, then it doesn’t really matter where Roles and
Profiles go.
For many organizations this is THE consideration that determines their choice,
but remember to build a workflow for today with the ability to adapt to
tomorrow. If you have a single person outside the ops team contributing to
Puppet, it doesn’t mean that you need to upend the workflow just for them.
Moving from something like having Roles & Profiles inside the Control Repo to
having them outside the Control Repo is an easy switch to implement (from
a technical standpoint), but the second you make that switch you’re adding
steps to EVERYONE’S workflow and changing the location of the most commonly
used modules within Puppet. That’s a heavy cost – don’t do it without reason.
So what are the OFFICIAL RECOMMENDATIONS THEN?!?!
We officially recommend you calm down with that punctuation. Beyond that, here it is:
Put Roles & Profiles within the site directory of the Control Repo unless you
have a specific reason NOT to.
Do you have multiple Puppet contributors and separate modules for EACH
INDIVIDUAL Profile? Then you might want to have separate repos for each
Profile and put them in Puppetfile to keep the development history separate.
You ALSO might want to put each individual Profile module in the site directory
of the Control Repo and just run with it that way. The bottom line here would
be access: who can/should access Profiles, who can/should access the Control
Repo, are those people the same, and do you need to restrict access for some
reason? Start with doing it this way and change WHEN YOU HIT THAT COMPLEXITY!
Don’t deviate because you ‘anticipate something’ – change when you’re ready
for it and don’t overarchitect early.
If you’re a smaller team with the same people who own the Puppet infrastructure
as who own Puppet module development and you have a couple of small internal modules
that don’t change very often, AND putting them inside the ‘site’ folder of
the Control Repo is easier for you than managing individual git repos, then by
all means do it!
Whew that was a lot. Basically, yes, I’ve outlined a narrow case because usually
creating a new git repository is a very small cost for an organization. If
you’re in an organization where that’s NOT the case, then the site directory
solution might appeal to you. What you gain in simplicity you lose in access
and security, though, so consider that ahead of time. Finally, the biggest factor
HERE is that the same people own the infrastructure and module code, so you can
afford to make shortcuts.
Have an internal Puppet Policy/Style Guide for where Puppet modules “go.”
If you’ve had the conversation and made the decision, DOCUMENT IT! It’s more
important to have an escalation path/policy for new Puppet users in your
organization to ensure consistency (the last thing you want to do is to keep
having this conversation every other month).
Moving a module from the ‘site’ directory to its own repository is not
difficult, but it does add workflow steps.
Remember that if a module doesn’t live in the ‘site’ directory then it needs
to get ‘pinned’ in Puppetfile, and that adds an extra step anytime that
module needs updated within a Puppet Environment.
Summary
First, if you’ve read this post it’s probably because you’re Googling for
material to support your cause (or someone cited this post as evidence to back
their position). You might have even skipped down here for “the answer.” Guess
what – shit doesn’t work like that! Storing Roles & Profiles (and/or other
Puppet modules) within the ‘site’ directory is an organizational choice based
on the workflow that best jives with an organization’s existing developmental
cycle and ownership requirements. The costs/benefits for each choice boil down
to access, security, and saving time. The majority of the time putting Roles
& Profiles in the Control Repo saves time and keeps all organizational-specific
information in one place. If you don’t have a great reason to change that,
then don’t.
Most people are bundling Hiera data with their Control repo (unless they have a very good reason not to)
Ditto for Roles and Profiles
The one-role-per-node rule is a good start, but PE’s rules-based classification engine allows us to relax that rule
Roles still include Profiles, but conditional logic is allowed and recommended to keep Hiera hierarchy levels minimal
‘Data’ goes in Hiera, but the definition of ‘data’ changes between organizations
There’s now a (somewhat) defined path for whether ‘data’ is included in a profile or Hiera
Automatic Parameter Lookup + Hiera…it’s still hard to debug, but we’re getting there
I’m incredibly wary of taking Uber during peak travel times with rate multipliers
It’s been awhile since I’ve had a good rant, so let’s get right into it!
Code Management with R10k
As of PE 3.8, R10k became bundled with Puppet Enterprise (PE) and was referred
to as “Code Management” which initially confused people because the only thing
about PE that was changed was that the R10k gem was preinstalled into PE’s Ruby
installation. The purpose of this act was twofold:
The Professional Services team was installing R10k in essentially EVERY services engagement, and so it made sense to ship R10k and thus officially support its installation
We’ve always had plans to keep the functionality that R10k provided but not NECESSARILY the tool-known-as-R10k, so calling the service it provided something OTHER than R10k would allow us to swap out the implementation underneath the hood while still being able to talk about the functionality it provided
Of course, if you didn’t live inside Puppet Labs it’s possible that you might not have gotten this
memo, but, hey: better late than never?
For various reasons, we also never initially shipped a PE-specific module to
configure R10k, so you ALSO had to either manually setup r10k.yaml or use
Zack Smith’s R10k module to manage that file. Of course, that
module did all kinds of OTHER things (like installing the R10k gem, setting up
webhooks, and making my breakfast), which meant that if you used it with the
version of PE that shipped R10k, you had to be careful to use the version of
the module that didn’t ALSO try to upgrade that gem on your system (and whoops
if the module actually upgraded the version of R10k that we shipped). This is
why that module is Puppet Approved but not an offical Puppet Labs module: it
does things that we would consider “unsupported” outside of a professional
services engagement (i.e. the webhook stuff). Finally, the path to
r10k.yaml was changed to /etc/puppetlabs/r10k/r10k.yaml, but, in its
absence, the old path of /etc/r10k.yaml would be used and a message would
be displayed to inform you of the new file path (in the case that both files
were present, the file at /etc/puppetlabs/r10k/r10k.yaml would win).
When PE version 2015.2.0 shipped (I’m still not used to these version numbers
either, folks), we FINALLY shipped a pe_r10k module with similar structure to
Zack’s R10k module – this meant you could FINALLY setup R10k immediatly without
having to install additional Puppet modules. Even better(er), in PE 2015.2.2 we
expose a couple of PE installer answer file questions that allow
you to configure R10k DURING INSTALL TIME – so now your servers could be
immediately bootstrapped with a single answers file (seriously, I know, it’s
about time; I do this shit every week, you have no idea). It finally feels like
R10k has grown into the first-class citizen we all wanted it to be!
Which means it’s time to dump it.
I kid. Mostly. The fact of the matter is that we’re introducing a new service
to manage code within Puppet Enterprise, and if you’re interested in reading more about it, check out this blog post by Lindsay Smith about Code Manager.
For you, the consumer, the process will be the same: you have a control
repo, you push changes, a service is triggered on your Puppet masters, and code
is synchronized on the Puppet master. What WILL change is the setup of this tool
(there will still be PE installer answer file questions that allow you to configure
this service, don’t fret, and you’ll still be able to configure this service through
a Puppet module, but the name of said module and configuration files on disk
will probably be different. Welcome to IT).
Be on the lookout for this service, and, as always, check out the PE docs site for
more information on the Code Management service.
Control (repo) freak
With the explosion of R10k came the explosion of “Control Repos” all over the place.
Everyone had one, everyone had an opinion on what worked best, and, well, we didn’t
really do a good job at offering a good startup control repo for you. Because of
that, we recently posted a ‘starter’ control repo on Github in the Puppet Labs
namespace that could be used to get started with R10k. Yes, it’s definitely long
overdue, but there it is! I use it on all engagements I do with new customers, so
you can guarantee it’ll have the use of Puppet Labs’ PS team behind it. If you’ve
not started with R10k yet (or if you have but you wanna see what kinda crazy shit
we’re doing now), check it out. It’s got great stuff in there like a config_version
script to spit out the most recent commit of the current branch of the control repo
(read: also current Puppet environment) as the “Config Version” string that Puppet
prints out during every Puppet run (see here for more info on this functionality).
We’re also slowly adding things like inital bootstrapping profiles that will do
things like configure R10k/Code Manager, manage the SSH key necessary to contact
the control repo (should you be using an internal git repository server and
also require an SSH key to access that repo), and so on. Star that repo and keep
checking back, especially around PE releases, to see if we’ve updated things in
a way that will help you out!
“Just put it in the control repo”
Look, if there’s one thing that my blog emphasizes (other than the fact that I’ve
got a hairpin trigger for cursing and an uncomfortable Harry Potter fetish) it’s
that “best practices” are inversely related to the insecurities of the speaker.
Fortunately, I have no problem saying when I’m wrong. If you’ve got the time,
allow me my mea culpa moment. In the past I had recommended:
Using a separate git repo for Hiera data
Using separate git repos for Roles and Profiles
The Dave Matthews Band
Time, experience, and the legalization of recreational marijuana in Oregon have
helped me see the error in my ways (though, look, #41 is a good goddamn song,
especially on the Dave & Tim Live at Luther College album), so allow me to provide
some insight into WHY I’ve reconsidered my message(s)…
Hiera Data
In the past, I recommended a separate git repo for Hiera data along with
a separate entry in r10k.yaml that would allow R10k to clone the Hiera data repo
along the same vein as the control repo. The pro was that a separate Hiera data
repo would afford you different access rights to this repo as you would the
control repo (especially if different people needed different access to each
function). The con was that now the branch structure of your Hiera data repo
needed to EXACTLY MIRROR the structure of your control repo….even if certain
branches had EXACTLY THE SAME Hiera data and no changes were necessary.
Puppet has enough moving parts, why did we need to complicate this if most
people didn’t care about access levels differing between the two repos? The
solution was to bundle the Hiera data inside the control repo all the way up
until you had a specific need to split it out. Truth be told both methods
work with Puppet, so the choice is up to you (read: I DON’T CARE WHICH METHOD
YOU USE OH MY GOD WILL YOU QUIT TRYING TO PICK A FIGHT WITH ME OVER THIS LOL) :)
Finally, there’s an added benefit of putting this data inside the control repo,
and it’s ALSO the reason for the next recommendation…
Roles and Profiles
This is one that I actually fought when someone suggested it…I even started to
recommend that a customer NOT do the thing I’m about to recommend to you until they
very eloquently explained why they did it. In the end, they were right, and I’m
passing this tip on to you: Unless you have a very specific reason NOT to,
put your ‘roles’ and ‘profiles’ modules in your control repo.
Here’s the thing about the control repo – you can set a post-receive hook on
the repository (or setup a Jenkins/Bamboo/whatever job) that will update all your
Puppet masters whenever changes are pushed to the remote git repository (i.e.
your git repository server). This means that anytime the control repo is updated
your Puppet masters will be updated. That’s why it’s CALLED the control repo – it
effectively CONTROLS your Puppet masters.
Understanding THAT, think about when you want your Puppet masters updated? Well,
you usually want to update them when you’re testing something out – you made a
change to a couple of modules, then a profile (and possibly also a role), and
now you wanna see if that code works on more than just your local laptop.
But the Puppet landscape has changed a bit as the Puppet Forge has matured – most
people are using modules off the Forge and are at least TRYING not to use their
own component modules. This means that changes to your infrastructure are being
controlled from within roles/profiles. But even IF you’re one of those people
who aren’t using the Forge or who have to update an internal component module,
you’re probably not wanting to update all your Puppet masters every time you
update a component module. There’s probably lots of tinkering there, and every
change isn’t “update-worthy”. Conversely, changes to your profiles probably
ARE “update-worthy”: “Okay, let’s pull this bit from Hiera, pass it as a parameter,
and now I’m ready to check it out on a couple of machines.”
If your roles and profiles modules are separate from your control repo, you
end up having to push changes to, say, a class in the profiles module, then
updating the Puppetfile in the control repo, then trigger an R10k run/sync.
If things aren’t correct, you end up changing the profile, pushing that change
to the profile repo, and THEN having to trigger an R10k run/sync (and if you
don’t have SSH access to your masters, you have to make a dummy commit to the
control repo so it triggers an R10k run OR doing a curl to some endpoint that
will update your Puppet master for you). That last step is the thing that ends
up wasting a bit of your time: why do we need to push a profile and then manually
do an R10k run of we’ve established that roles and profiles will pretty much
ALWAYS be “update-worthy”? We don’t. If you put the roles and profiles module
inside the control repo, then it will automatically update your Puppet masters
every time you make a change to one or the other. Bam – step saved. ALSO, if
you do this, you can take Roles/Profiles out of Puppetfile, which means you
no longer need to pin them! No more will you have to tie that module to a topic
branch during development time: just create a branch of the control repo and
go to town! Wow, that saves even more time! I’m uncomfortable with this level
of excitement!
The one thing you WILL need to do is to update environment.conf so that it
knows to look for the roles/profiles modules in a different path from all the
other modules (because removing it from Puppetfile means that it will no longer
go to the same modulepath as every other module managed inside Puppetfile).
For the purposes of cleanliness, we usually end up putting both roles/profiles
inside a site folder in the control repo. If you do that, your modulepath
in environment.conf looks a little something like this:
1
modulepath = site:modules:$basemodulepath
This means that Puppet will look for modules first in the ‘site’ directory of
its current environment (this is the directory where we put roles/profiles),
and then inside the ‘modules’ directory (this is where modules managed in Puppetfile
are cloned by default), and then in $basemodulepath (i.e. modules common to all
environments and also modules that Puppet Enterprise ships).
LOOK, BEFORE YOU FREAK OUT, YES, SITE COMES FIRST HERE, AND OTHER PEOPLE HAVE
SITE COME SECOND! Basically, if you have roles/profiles in the ‘site’ directory
AND you manage to still have the module in Puppetfile, then the module in the ‘site’
directory will win. Feel free to flip/flop that if you want.
TL;AR: (yes, you already read all of this so it’s futile) put roles/profiles
inside the site directory of the control repo to save you time, but also don’t
do it if you have a specific reason not to…or if you like being contrarian.
Dave Matthews
The “Everyday” album was the “jump the shark” moment for the Dave Matthews band,
while the leaked “Lillywhite Sessions” that would largely make it to “Busted Stuff”
definitely indicated where the band wanted to go. They never recovered after that,
and, just like Boone’s Farm ‘wine’, I stopped partaking in them.
Also, not ONCE did being able to play most every Dave Matthews song on the
acoustic guitar ever get me laid…though I can’t tell exactly whose fault that
was. On second thought, that was probably me. Though Tim Reynolds is an absolute
beast of a musician; I’m still #teamtim.
One role per node, until you don’t want to
Why do we even make these rules if you’re not gonna follow them? It’s getting
awfully “Who’s Line Is It Anyways?” up in here. Before PE 3.7, and its
rules-based classification engine, we recommended not assigning more than one
role to a node. Why? Well, the Puppet Enterprise Console around that time
wasn’t the best at tracking changes or providing authentication around tasks
like classification. This meant if you tried to manage ALL of your
classification within the console you could have a hard time telling when
things changed or why. Fortunately, git provides you with this functionality.
Because of that, we (and when I say ‘we’ I mean ‘everyone in the field trying
to design a Puppet workflow that not only made sense but also had some level of
accountability’) tried to displace most classification tasks from the Console
into flat files that could be managed with git. This is largely the impetus for
Roles and Profiles when you think about it: Profiles connect Puppet to external
ata and give you a layer to express dependencies between multiple Puppet
classes, and Roles is a mechanism for boiling down classification to a single
unit.
Once we launched a new Node Classifier that had a rules-based classification
engine AND role-based authentication control, we became more comfortable
delegating some of these classification tasks BACK to the console. The Node
Classifier ALSO made it easy to click on a node and not only see what was
classified to that node, but also WHERE it got that bit of classification
from (“This node is getting the JBoss profile because it was put into the
App Servers nodegroup”). With that level of accountability, we could start
relaxing our “One Role Per Node™” mandate, OR eliminate the roles module
altogether (and use nodegroups in the Node Classifier in place of roles).
The goal has always been to err on the side of “debugability” (I like making words).
I will usually try to optimize a task for tracing errors later, because I’ve been
a sysadmin where the world is falling apart around you and you need to quickly
determine what caused this mess. Using one role per node makes sense if you
don’t use a node classifier that gives you this flexibility, but MIGHT not if
you DO use a classifier that has some level of accountability.
Roles, conditional logic, Hiera, and you
Over time as I’ve talked to people that ended up building Puppet workflows
based on the things I’ve written (which still feels batshit crazy to me,
by the way, since I’ve known myself for over 34 years), I’ve noticed that people
seem to take the things I say VERY LITERALLY. And to this I say: “You should
probably send me money via Paypal.” Also – note that I’m writing these things
to address the 80% of people out there using/getting started with Puppet. You
don’t HAVE to do what I say, especially if you have a good reason not to, and
you SHOULDN’T do what I say, especially if you’re the one that’s going to stay
with that organization forever and manage the entire Puppet deployment. For
everyone else out there, let’s talk some more about roles.
The talking points around roles has always been “Roles include profiles; that’s it.”
Again, going back to the idea that roles exist to support classification, this
makes sense – you don’t want to add resources at a very high level like a roles
class because, well, honestly, there’s probably a better place for it, but any
logic added to simply classification is a win.
Consider an organization that has both Windows and Linux application servers.
The question of whether to have separate roles for Linux and Windows
application servers is always one of the first questions to be surfaced. At
a low level, everything you do in a Puppet manifest is solely for the
purpose of getting resources into the catalog (a JSON object containing
a list of all resource Puppet is to be managing ond their desired end-state).
Whether you have two different roles matters not to Puppet so long as the
right node gets the right catalog. For a Puppet developer writing code, having
two separate roles also might not matter (and, in reality, based on the amount
of code assigned to either role, it might be cleaner to have different roles
for each). For the person in charge of classifying nodes with their assigned
role, it’s probably easier to have a single role (roles::application_server, for example)
that can be assigned to ALL application servers, and then logic inside the role
to determine whether this will be a Windows application server using IIS or
a Linux application server using JBoss (or, going further, a Linux application
server running Weblogic, or Websphere, or Tomcat, whatever). Like we mentioned
in the previous point, if you’re using the “One role per node” philosophy, then
you probably want a single role with conditional logic to determine Windows/Linux,
and then determine Tomcat/JBoss, and so on. If you’re using the Puppet Enterprise
Console’s node classifier, and thus the rule-based engine, you can afford not
to care about the number of node groups you create because you can create a rule
to match for application servers, and then a rule to match on operating system,
and create as many rules as you want to dynamically discover and classify nodes
on the fly.
The point here is that the PURPOSE of the Role is to aid classification, and
the focus on creating a role is to start small, use conditional logic to
determine which profiles to include, and then simply include them. If that
conditional logic uses Facter facts, awesome. If you need to look at a variable
coming from the Console to do the job, fine – go for it! But if you’re using
the Role as a substitute for a Profile (i.e. data lookups, declaring classes,
even declaring resources), then you’re probably going down a path that’s gonna
make it confusing for people follow what’s going on.
Bottom line: technology-agnostic roles that utilize conditional logic around
including profiles is a win, but keep tasks like declaring resources and
component modules to Profiles. Doing this provides a top-down path for
debugging and a cleaner overall Puppet codebase.
What the hell is ‘Data’ anyhow?
This point has single-handedly caused more people to come up and argue with me.
I’m not kidding. I shit you not, I’ve had people legitimately *SCREAM* at me
about how wrong I was with my opinions here. The cool thing is that people LOVE
the idea of Hiera – it lets you keep the business-specific data out of your
Puppet manifests, it’s expressed in YAML and not the Puppet DSL, and when it
works, it’s magical.
The problem is that it’s fucking magical. Seriously.
So what IS a good use of Hiera? Anytime you have a bit of data that is subject
to override (for example: the classical NTP problem where everyone should use
the generic company NTP server, except nodes at this location should use a
different NTP server, and this particular node should use ITSELF as its NTP
server), that bit of data goes into Hiera (and by ‘that bit of data’, I mean
‘the value of the NTP server’ or ‘the NTP server’s FQDN’), which would look
SOMETHING like this:
1
ntpserver:pool.ntp.org
What does NOT go into Hiera is a hash-based representation of the Puppet
resource that would then be passed to create_resources() and used to create
the resource in the catalog…which would look something like this:
…which would then be passed into Puppet like this:
1
create_resources('file',hiera_hash('ntpfiles))
Yes, this is an exaggeration based on a very narrow use case, but what I’m trying
to highlight is that the ‘data’ bit in all that above mess is SOLELY an FQDN,
and everything else is arguably the “Model”, or your Puppet code.
Organizations LOVE that you can put as much “stuff” into Hiera as you want and
then Puppet can call Hiera, create resources based on what it tells you, and
merrily be on your way. Well, they “love” it until it doesn’t work or does
something unexpected, and then debugging Hiera is a right bastard.
Understand that the problem I have would be with unexpected Hiera behavior. If
you’re skilled in the ways of the Hiera and its (sometimes cloudy) interaction
with Puppet, then by ALL means use it for whatever ya like. BUT, if you’re
still new to Puppet, then you may have a very loose mental map for how Hiera
works and where it interacts with Puppet…and nobody should have to have that
advanced level of knowledge just to debug the damn thing.
The Hiera + create_resources() use above is of particular nastiness simply
because it turns your Hiera YAML files into a potential mechanized weapon of Puppet
destruction. If I know that you’re doing this under the hood, I could
POTENTIALLY slip data into Hiera that would end up creating resources on a node
to do what I want. Frequently Puppet code is more heavily scrutinized than
Hiera data, and I could see something like this getting overlooked (especially
if you don’t have a ton of testing around your Puppet code before it gets
deployed).
The REASON why create_resources() was created was because Puppet lacked the
ability to do things like recursion and loops inside the DSL, and sometimes
you WANT to automate very repeated tasks. Consider the case where you truly
DON’T know how many of something is going to be on a node ahead of time – maybe
you’re using VMware vRO/vRA and someone is building a node on-the-fly with
the web GUI. For every checkbox someone ticks there will be another application
to be installed, or another series of firewall rules, or SOMETHING like that.
You can choose to model these individually with profiles, OR, if the task is
repetitive, you can accept their choices as data and feed it back into Puppet
like a defined resource type. In fact, most use-cases for Hiera + create_resources()
is passing data into a defined resource type. As of Puppet 4.x.x, we have
looping constructs inside the DSL, so we can finally AUTOMATE these tasks
without having to use an extra function (of course, in THIS use case, whether
you use recursion/looping in the DSL or create_resources() matters not – you
get the same thing in the end).
For one last point, the Puppet DSL is still pretty easy to read (as of right now),
and most people can follow what’s going on even if they’re NOT PuppEdumicated.
Having 10 resource declarations in a row seems like a pain in the ass to write
when you’re doing it, but READING it makes sense. Later on, if you need to know
what’s going on with this profile, you can scan it and see exactly what’s there.
If you start slipping lots of data into Hiera and looping logic into the DSL,
you’re gonna force the person who manages Puppet to go back and forth between
reading Hiera code, then back to Puppet code, then back to the node, and so on.
Again, it’s totally possible to do now, and frequently NECESSARY when you have
a more complex deployment and well-trained Puppet administrators, but initially
it’s possible to build your own DSL to Puppet by slipping things into Hiera and
running away laughing.
So when do I put this ‘data’ into the Profile and when is a good time to put it
into Hiera? I’m glad you asked…
A path to Hiera data
These last two points I’ve written about before. I may be repeating myself, but
bytes are cheap. Like I wrote above (and before), putting data directly into a
Profile is the easiest and most legible way of providing “external data” into
Puppet. Yes, you’ll argue, putting the data into a Profile, which is Puppet code,
is ARGUABLY NOT being very “external” about it. In my opinion it is – your Profile
is YOUR IMPLEMENTATION of a technology stack, and thus isn’t going to be shared
outside your organization. I consider that external to all the component modules
out there, but, again, potato/potato. I recommend STARTING HERE when you’re getting
started with Puppet. Hiera comes in when you have a very clear-cut need for
overriding data (a la: this NTP server everywhere, except here and here). The second
you might need to have different data, you can either start building conditional logic
inside the Profile, OR use the conditional logic that Hiera provides.
So – which do you use?
The point of Hiera is to solve 80% or better of all conditional choices in your
organization. Consider this data organization model:
Everyone shares most of the same data items
San Francisco/London do their own things sometimes
Application tiers get their own level for dev/test/qa/prod-specific overrides
Combinations of tiers/locations/and business units want their own overrides
Node specific data is the most specific (and least-used) level
If you’re providing some data to Puppet that follows this model, then cool
– use Hiera. What about specific “exceptions” that don’t fit this model? Do you
try to create specialized layers in Hiera just for these exceptions? Certain
organizations absolutely do – I see it all the time. What you find is that
certain layers in Hiera go together (this location/tier/business_unit level
goes right above location/tier, which goes right above location), and we
start referring to those coupled layers as “Chains”. Chains are usually tied
to some specific need (deploying applications, for example). Sometimes you
create a chain just to solve a VERY SPECIFIC hard problem (populating
/etc/sudoers in large organizations, for example).
The question is – do I create another “Chain” of layers in the hierarchy
solely because deploying sudoers is hard, or do I throw a couple of case
statements into the sudoers profile and keep it out of Hiera altogether?
My answer is to start with conditional logic in the sudoers profile and break
it out into Hiera if you see that “Chain” being needed elsewhere. Why? Because, like
I’ve said many times before, debugging Hiera kinda sucks right now – there’s no
way currently to get a dump of all variables and parameters for a particular node
and determine which were set by Hiera, which were set with variables in the DSL, which
came out of the console, and so on. If we HAD that tool, I’d be all about using
it and polluting your hierarchy all day long (I expand upon this slightly in the
next point about the Automatic Parameter Lookup + Hiera).
Bottom line: Start with the data in the Profile, then move it to Hiera when you
need to override. Start with conditional logic in the Profile, then create a
“Chain” in the Hierarchy if you need to use it in more than one place.
Hiera, APL, Refactoring, WTF
Like I said, I’ve written about this before. I like the Automatic Parameter
Lookup functionality in Puppet – it’s ace. I like Hiera. But if you don’t know
how it works, or that it exists, it feels too much like Magic. There are certain
things in the product that can ONLY be set by putting data inside Hiera and running
Puppet, and that is truly an awesome thing: just tell a customer “drop this bit
of data somewhere in Hiera, run Puppet, and you’re all set.” But, again, if you
need to know how a particular line got into a particular config file on your
node, and it was set with the APL, then you’ve got some digging to do.
There’s still no tool, like I mentioned in the last item, to give me full
introspection into all variables/parameters set for a node and that
variable/parameter’s origin. Part of the reason as to WHY this tool doesn’t
exist is because the internals of Puppet don’t necessarily make it easy for you
to determine where a parameter/variable was set. That’s OUR problem, and
I feel like we’re slowly making progress on marking these things internally so
we can expose them to our customers. Until then, you have to trace through code
and Hiera data.
I know the second I publish and tweet about this, I’m gonna get a message from
R.I. Pienaar saying that I’ve crazy for NOT pushing people toward using Hiera
more with the Automatic Parameter Lookup, because the more we use it, the faster
we can move away from things like params classes, and profiles, and everything
else, but the reality is I’m ALL ABOUT PEOPLE using it if they know how it works.
I’m ACTUALLY fucking happy that it works well for you – please continue to use
it and do awesome Puppet things. I only recommend to people who are getting
started to NOT USE it FIRST, and then, when you understand how it would help
you by clocking some hours of Puppet code writing and debugging, do some refactoring
and move to it!
Yes, refactoring is involved.
Look, refactoring is a way of life. You’re gonna re-tool your Puppet code for
the purposes of legibility, or efficiency, or any of the many other reasons why
you refactor code – it’s unavoidable. Also, if I come into your org and setup
Puppet for the most efficient use-case, and then I leave that into your
relatively-new-to-Puppet hands, it’s probably not gonna be the best situation
because you won’t have known WHY I made the decisions I did (and, even if I
document them, you might have gaps of knowledge that would help you understand
the problems I’m helping you avoid).
Sometimes hitting the problem so you have first-hand knowledge of why you need
to avoid it in the future isn’t the WORST thing in the world.
To move to any configuration management system means you’re gonna be
refactoring. Embrace it. Start small, get things working, then clean it up.
Don’t try to build the “fortress of sysadmin perfection” with your first bit of
Puppet code – just get shit done! Allow yourself time during the month simply
to unwind some misgivings you realize after-the fact, and definitely seek
advice before doing something you feel might be particularly complex or
overarching, but getting shit done is gonna trump “not working” any day (or
whatever the manager-y buzzspeak is this week).
Bottom Line: APL if you understand it, start small, get shit done, refactor, repeat
Hopefully this leads to more posts
Holy shit, you’re still reading?! Ohh, you skimmed down this far to see how long
this post was gonna be – got it. Either way, I’m glad I finally got this out there.
It’s been months, yes, but that doesn’t mean I haven’t been writing. We’ve been
doing lots of internal work to try and get more official docs out to you and
less of “Go read Gary’s blog!” You’ll notice R10k has some official docs, right?!
Yeah, that’s awesome! We want more of that. BUT, there’s still going to be times
where I feel like what I’m gonna say isn’t necessarily the “party line”, and that’s
what this blog is about.
Thanks to everyone at Puppetconf and beyond who approached me and told me how
much they love what I write. I’m gonna be humble as fuck in person, but I really
do get excited whenever someone says that. It’s also crazy as hell when someone
from Wal-mart approaches you and says they built part of their deployment based
on the shit you wrote. From a guy who came from a town in Ohio with a population
of less than 8000 people, it’s crazy to see where you’re “recognized.”
So thank you, again, for all the support.
And sorry, Dave Matthews – it’s not you, it’s me. Actually, that’s a lie; it was you.
Hiera. That thing nobody is REALLY quite sure how to say (FYI: It’s pronounced
‘hiera’), the tool that everyone says you should be using, and the tool that
will make you hate YAML syntax errors with a passion. It’s a data/code
separation dream, (potentially) a debugging nightmare, and absolutely vital in
creating a Puppet workflow that scales better than your company’s Wifi strategy
(FYI: your company’s Wifi password just changed. Again. Because they’re not
using certificates). I’ve already written a GOOD AMOUNT on why/how to use it,
but now I’m going to give you a couple of edge cases. Call them “best
practices” (and I’ll cut you), but I like to call it “shit I learned
after using Hiera in anger.” Here are a couple of the most popular questions
I hear, and my usual responses…
“How should I setup my hierarchy?”
This is such a subjective question because it’s specific to your organization
(because it’s your data). I usually ask back “What are the things about your
nodes that are different, and when are they different?” Usually I hear something
back like “Well, nodes in this datacenter have different DNS settings” or
“Application servers in production use one version of java, and those in dev
use a different version” or “All machines in the dev environment in this datacenter
need to have a specific repository”. All of these replies give me ideas to your
hierarchy. When you think of Hiera as a giant conditional statment, you can
start seeing how your hierarchy could be laid out. With the first response, we
know we need a location fact to determine where a node is, and then we can
have a hierarchy level for that location. The second response tells me we need
a level for the application tier (i.e. dev/test/prod). The third response tells
me we need a level that combines both the location and the application tier. When
you add in that you should probably have a node-specific level at the top (for
overrides) and a default level at the bottom (or not: see the next section), I’m
starting to picture this:
Every time you have a need, you consider a level. Now, obviously, it doesn’t
mean that you NEED a level for every request (sometimes if it’s an edge case
you can handle it in the profile or the role). There’s a performance hit for
every level of your Hiera hierarchy, so ideally keep it minimal (or around
5 levels or so), but we’re talking about flexibility here, and, if that’s more
important than performance then you should go for it.
Next comes ordering. This one’s SLIGHTLY easier – your hierarchy should read from
most-specific to least-specific. Note that when you specify an application tier
at a specific location that that it is MORE specific than just saying “all nodes in
this application tier.” Sometimes you will have levels that might be hard to
define an order – such as location vs. application tier. You kinda just have to
go with your gut here. In many cases you may find that the data you put in those
two levels will be entirely different (location-based data may not ever overlap
with application-tier-specific data). Do remember than any time you change the
order of your hierarchy you’re going to introduce the possibility that values
get flip/flopped.
If you look at level 3 of the hierarchy above, you’ll see that I have ‘common’
at the end. Some people like this syntax (where they put a ‘common’ file in a
folder that matches the fact they’re checking against), and some people prefer
a filename matching the fact. Do what makes you happy, but, in this case,
we can unify the location folder and just put the common file underneath the
application tier files.
Finally, DO MAKE USE OF FOLDERS! For the love of god, this. Putting all files
in a single folder both makes that a BIG folder, but also introduces a namespace
collision (i.e. what if you have a location named ‘dev’ for example? Now you have
both an application tier and a location with the same name. Oops).
How you setup your hierarchy is up to you, but this should hopefully give you
somewhere to start.
Common.yaml, your organization’s common values – REVISED
UPDATE – 28 October
Previously, this section was where I presented the idea of removing the lowest
level of the hierarchy as a way of ensuring that you didn’t omit a value in Hiera
(the idea being that common values would be in the profile, anything higher would
be in Hiera, and all your ‘defaults’, or ‘common values’ would be inside the profile).
The idea of removing the lowest level of the Hiera hierarchy was always something
I was kicking around in my head, but R.I. made a comment below that’s made me revise
my thought process. There’s still a greater concern around definitively tracking
down values pulled from Hiera, but I think we can accomplish that through other
means. I’m going to revise what I wrote below to point out the relevant details.
When using Hiera, you need to define a hierarchy that Hiera uses in its search
for your data. Most often, it looks something like this:
Notice that little “common” at the end? That means that, failing everything
else, it’s going to look in common.yaml for a value. I had thought of common
as the ‘defaults’ level, but the reality is that it is a list of values common
across all the nodes in your infrastructure. These are the values, SPECIFIC TO
YOUR ORGANIZATION, that should be the same everywhere. Barring an override at a
higher level, these values are your organization’s ‘defaults’, if you will.
Previously, you may have heard me rail against Hiera’s optional second argument
and how I really don’t like it. Take this example:
1
$foo=hiera('port','80')
Given this code, Hiera is going to look for a parameter called ‘port’ in its
hierarchy, and, if it doesn’t find one in ANY of the levels, assign back a default
value of ‘80’. I don’t like using this second argument because:
If you forget to enter the ‘port’ parameter into the hierarchy, or typo it in the YAML file, Hiera will gladly assign the default value of ‘80’ (which, unless you’re checking for this, might sneak and get into production)
Where is the real ‘default’ value: the value in common.yaml or the optional second argument?
It actually depends on where you do the hiera() call as to what ‘kind’ of
default value this is. Note that previously we talked about how the ‘common’
level represented values common across your infrastructure. If you do this
hiera() call inside a profile (which is where I recommend it be done), providing
the optional second argument ends up being redundant (i.e. the value should be
inside Hiera).
The moral of this story being: values common to all nodes should be in the
lowest level of the Hiera hierarchy, and all explicit hiera calls should
omit the default second argument if that common value is expected to be found
in the hierarchy.
Data Bindings
In Puppet 3, we introduced the concept of ‘data bindings’ for parameterized classes,
which meant that Puppet now had another choice for gathering parmeter values.
Previously, the order Puppet would look to assign a value for parameters to
classes was:
A value passed to the class via the parameterized class syntax
A default value provided by the class
As of Puppet 3, this is the new parameter assignment order:
A value passed to the class via the parameterized class syntax
A Hiera lookup for classname::parametername
A default value provided by the class
Data bindings is meant to be pluggable to allow for ANY data backend, but,
as of this writing, there’s currently only one: Hiera. Because of this,
Puppet will now automatically do a Hiera lookup for every parameter to a
parameterized class that isn’t explicitly passed a value via the parameterized
class syntax (which means that if you just do include classname, Puppet
will do a Hiera lookup for EVERY parameter defined to the “classname” class).
This is really cool because it means that you can just add classname::parametername
to your Hiera setup, and, as long as you’re not EXPLICITLY passing that
parameter’s value to the class, Puppet will do a lookup and find the value.
It’s also completely transparent to you unless you know it’s happening.
The issue here is that this is new functionality to Puppet, and it feels like
magic to me. You can make the argument and say “If you don’t start using it,
Gary, people will never take to it,” however I feel like this kind of magical
lookup in the background is always going to be a bad thing.
There’s also another problem. Consider a Hiera hierarchy that has 15 levels
(they exist, TRUST ME). What happens if you don’t define ANY parameters in
Hiera in the form of classname::parametername and simply want to rely on
the default values for every class? Well, it means that Hiera is STILL going
to be triggered for every parameter to a class that isn’t explicitly passed a
value. That’s a hell of a performance hit. Fortunately, there’s a way to
disable this lookup. Simply add the following to the Puppet master’s puppet.conf
file:
1
data_binding_terminus = none
It’s going to be up to how your team needs to work as to whether you use Hiera
data bindings or not. If you have a savvy team that feels they can debug these
lookups, then cool – use the hell out of it. I prefer to err on the side of an
explicit hiera() lookup for every value I’m querying, even if it’s a lot of extra
lines of code. I prefer the visibility, especially for new members to your team.
For those people with large hierarchies, you may want to weigh the performance
hit. Try to disable data bindings and see if your master is more performant. If
so, then explicit hiera() calls may actually buy you some rewards.
PROS:
Adding parameters to Hiera in the style of classname::parametername will set parameterized class values automatically
Simplified code – simply use the include() function everywhere (which is safer than the parameterized class syntax)
CONS:
Lookup is completely transparent unless you know what’s going on
Debugging parameter values can be difficult (especially with typos or forgetting to set values in Hiera)
Performance hit for values you want to be assigned the class default value
Where to data – Hiera or Profile?
“Does this go right into the Profile or into Hiera?” I get that question
repeatedly when I’m working with customers. It’s a good question, and one of
the quickest ways to blow up your YAML files in Hiera. Here’s the order I use
when deciding where to put data:
WHERE did that data come from?
Remember that the profile is YOUR implementation – it describes how YOU define
the implementation of a piece of technology in YOUR organization. As such, it’s
less about Puppet code and more about pulling data and passing it TO the Puppet
code. It’s the glue-code that grabs the data and wires it up to the model that
uses it. How it grabs the data is not really a big deal, so long as it grabs
the RIGHT data – right? You can choose to hardcode it into the Profile, or use
Hiera, or use some other magical data lookup mechanism – we don’t really care
(so long as the Profile gathers the data and passes it to the correct Puppet
class).
The PROBLEM here is debugging WHERE the data came from. As I said previously,
Hiera has a level for all bits of data common to your organization, and, obviously,
data overridden at a higher level takes precedence over the ‘common’ level at
the bottom. With Hiera, unless you run the hiera binary in debug mode (-d),
you can never be completely sure where the data came from. Puppet has no way of
dumping out every variable and where it came from (whether Hiera or set directly
in the DSL, and, if it WAS Hiera, exactly what level or file it came from).
It is THIS REASON that causes me to eschew things like data bindings in Puppet.
Debugging where a value came from can be a real pain in the ass. If there were
amazing tooling around this, I would 100% support using data bindings and just
setting everything inside Hiera and using the include() function, but, alas,
that’s not been my experience. Until then, I will continue to recommend explicit
hiera calls for visibility into when Hiera is being called and when values
are being set inside the DSL.
Enter the data into the Profile
One of the first choices people make is to enter the data (like ntpserver
address, java version, or whatever it is) directly into the Profile.
“BUT GARY! IT’S GOING TO MAKE IT HARD TO DEBUG!” Not really. You’re going to
have to open the Profile anyway to see what’s going on (whether you pull the
data from Hiera or hardcode it in the Profile), right? And, arguably, the
Profile is legible…doing Hiera lookups gives you flexibility at a cost of
abstracting away how it got that bit of data (i.e. “It used Hiera”). For newer
users of Puppet, having the data in the Profile is easier to follow. So, in the
end, putting the data into the Profile itself is the least-flexible and most-visible
option…so consequently people consider it as the first available option. This option
is good for common/default values, BUT, if you eventually want to use Hiera, you need
to re-enter the data into the common level of Hiera. It also splits up your
“source of truth” to include BOTH the Profile manifest and Hiera. In the end,
you need to weigh your team’s goals, who has access to the Hiera repo, and
how flexible you need to be with your data.
PROS:
Data is clearly visible and legible in the profile (no need to open additional files)
CONS:
Inability to redefine variables in Puppet DSL makes any settings constants by default (i.e. no overriding permitted)
Data outside of Hiera creates a second “source of truth”
Enter the data into Hiera
If you find that you need to have different bits of data for different nodes
(i.e. a different version of Java in the dev tier instead of the prod tier),
then you can look to put the data into Hiera. Where to put the data is going
to depend on your own needs – I’m trusting that you can figure this part out – but
the bigger piece here is that once the data is in Hiera you need to ensure
you’re getting the RIGHT data (i.e. if it’s overridden at a higher level, you
are certain you entered it into the right file and didn’t typo anything).
This answers that “where” question, but doesn’t answer the “what” question…as
in “What data should I put into Hiera?” For that, we have another section…
PROS:
Flexibility in returning different values based on different conditions
All the data is inside one ‘source of truth’ for data according to your organization
CONS:
Visibility – you must do a Hiera lookup to find the value (or open Hiera’s YAML files)
“What exactly goes into Hiera?”
If there were one question that, if answered incorrectly, could make or break
your Puppet deployment, this would be it. The greatest strength and weakness of
Hiera is its flexibility. You can truly put almost anything in Hiera, and, when
combined with something like the create_resources() function, you can create
your own YAML configuration language (tip: don’t actually do this).
“But, seriously, what should go into Hiera, and what shouldn’t?”
The important thing to consider here is the price you pay by putting data into
Hiera. You’re gaining flexibility at a cost of visibility. This means that you
can do things like enter values at all level of the hierarchy that can be
concatenated together with a single hiera_array() call, BUT, you’re losing the
visibility of having the data right in front of you (i.e. you need to open up
all the YAML files individually, or use the hiera binary to debug how you got
those values). Hiera is REALLY COOL until you have to debug why it grabbed (or
DIDN’T grab) a particular value.
Here’s what I usually tell people about what should be put into Hiera:
The exact data values that need to be different conditionally (i.e. a different ntp server for different sites, different java versions in dev/prod, a password hash, etc.)
Dynamic data expressed in multiple levels of the hierarchy (i.e. a lookup for ‘packages’ that returns back an array of all the values that were found in all the levels of the hierarchy)
Resources as a hash ONLY WHEN ABSOLUTELY NECESSARY
Puppet manifest vs. create_resources()
Bullets 1 and 2 above should be pretty straightforward – you either need to use
Hiera to grab a specific value or return back a list of ALL the values from ALL
the levels of the hierarchy. The point here is that Hiera should be returning
back only the minimal amount of data that is necessary (i.e. instead of
returning back a hash that contains the title of the resource, all the attributes
of the resource, and all the attribute values for that resource, just return
back a specific value that will be assigned to an attribute…like the password
hash itself for a user). This data lookup appears to be “magic” to new users of
Puppet – all they see is the magic phrase of “hiera” and a parameter to search
for – and so it becomes slightly confusing. It IS, however, easier to understand
that this magical phrase will return data, and that that data is going to be used
to set the value for an attribute. Consider this example:
This leads us to bullet 3, which is “the Hiera + create_resources() solution.”
This solution allows you to lookup data from within Hiera and pass it directly
to a function where Puppet creates the individual resources as if you had typed
them into a Puppet manifest itself. The previous example can be entered into
a Hiera YAML file like so:
And then a resource can be created inside the Puppet DSL by doing the following:
12
$users=hiera('users')create_resources('users')
Both examples are functionally identical, except the first one only uses Hiera
to get the password hash value, whereas the second one grabs both the
attributes, and their values, for a specific resource. Imagine Puppet gives you
an error with the ‘gary’ user resource and you were using the latter example.
You grep your Puppet code looking for ‘gary’, but you won’t find that user
resource in your Puppet manifest anywhere (because it’s being created with the create_resources() function).
You will instead have to know to go into Hiera’s data directory, then the
correct datafile, and then look for the hash of values for the ‘gary’ user.
Functional differences between the two approaches
Functionally, you COULD do this either way. When you come up with a solution
using create_resources(), I challenge you to draw up another solution using
Puppet code in a Puppet manifest (however lengthy it may be) that queries Hiera
for ONLY the specific values necessary. Consider this example, but, instead,
you need to manage 500 users.
If you use create_resources(), you would then need to add 500 more blocks to
the ‘users’ parameter in your Hiera datafiles. That’s a lot of YAML. And on
what level will you add these blocks? prod.yaml? dev.yaml? Are you using a
common.yaml? Your YAML files suddenly got huge, and the rest of your team
modifying them will not be so happy to scroll through 500 entries. Now consider
the first example using Puppet code. Your Puppet manifest suddenly grew, but it
didn’t affect all the OTHER manifests out there: only this file. The Hiera YAML
files will still grow – but now 500 individual lines instead of 3000 lines in
the previous example. Okay, now which one is more LEGIBLE? I would argue that
the Puppet manifest is more legible, because I consider the Puppet DSL to be
very legible (again, subject to debate versus YAML). Moreover, when debugging,
you can stay inside Puppet files more often using Puppet manifests to define
your resources. Using create_resources, you need to jump into Hiera more often.
That’s a context shift, which adds more annoyance to debugging. Also, it
creates multiple “sources of truth.” Suddenly you have the ability of entering
data in Hiera as well as entering it in the Puppet manifest, which may be clear
to YOU, but if you leave the company, or you get another person on your team,
they may choose to abuse the Hiera settings without knowing why.
Now consider an example that you might say is more tailored to create_resources().
Say you have a defined type that sets up tomcat applications. This defined type
accepts things like a path to install the application, the application’s package
name, the version, which tomcat installation to target, and etc. Now consider
that all application servers need application1, but only a couple
of servers need application2, and a very snowflake server needs application3 (in
this case, we’re NOT saying that all applications are on all boxes and that their
data, like the version they’re using, is different. We’re actually saying that
different machines require entirely different applications).
Using Hiera + create_resources() you could enter the resource for the
application1 at a low level, then, at a higher level, add the resource for
application2, and finally add the resource for application3 at the
node-specific level. In the end, you can do a hiera_hash() lookup to discover
and concatenate all resources from all levels of the hierarchy and pipe that to
create_resources.
How would you do this with Puppet code? Well, I would create profiles for every
application, and either different roles for the different kinds of servers (i.e.
the snowflake machine gets its own role), or conditional checks inside the role
(i.e. if this node is at the London location, it gets these application profiles,
and etc…).
Now which is more legible? At this point, I’d still say that separate profiles
and conditional checks in roles (or sub-roles) are more legible – including
a class is a logical thing to follow, and conditionals inside Puppet code are
easy to follow. The create_resources() solution just becomes magic. Suddenly,
applications are on the node. If you want to know where they came from, you
have to switch contexts and open Hiera data files or use the hiera binary
and do a debug run. If you’re a small team that’s been using Puppet forever,
then rock on and go for it. If you’re just getting started, though, I’d shy
away.
Final word on create_resources?
12
Some people, when confronted with a problem, think “I know, I'll use create_resources()."
Now they have two problems.
The create_resources() function is often called the “PSE Swiss Army knife”
(or, Professional Services Engineer – the people who do what
I do and consult with our customers) because we like to break it out when we’re
painted into a corner by customer requirements. It will work ANYWHERE, but, again,
at that cost of visibility. I am okay with someone using it so long as they
understand the cost of visibility and the potential debugging issues they’ll hit.
I will always argue against using it, however, for those reasons. More code in
a Puppet manifest is not a bad thing…especially if it’s reasonably legible
code that can be kept to a specific class. Consider the needs and experience
level of your team before using create_resources() – if you don’t have a good
reason for using it, simply don’t.
create_resources()
PROS:
Dynamically iterate and create resources based on Hiera data
Using Hiera’s hash merging capability, you can functionally override resource values at higher levels of the hierarchy
CONS:
Decreased visibility
Becomes a second ‘source of truth’ to Puppet
Can increase confusion about WHERE to manage resources
When used too much, it creates a DSL to Puppet’s DSL (DSLs all the way down)
Puppet DSL + single Hiera lookup
PROS:
More visible (sans the bit of data you’re looking up)
Using wrapper classes allows for flexibility and conditional inclusion of resources/classes
CONS:
Very explicit – doesn’t have the dynamic overriding capability like Hiera does
Using Hiera as an ENC
One of the early “NEAT!” moments everyone has with Hiera is using it as an
External Node Classifier, or ENC. There is a function called hiera_include()
that allows you to include classes into the catalog as if you were to write
“include (classname)” in a Puppet manifest. It works like this:
Given the above example, the hiera_include() function will search every level
of the hierarchy looking for a parameter called ‘classes’. It returns
a concatenated list of classnames, which it then passes to Puppet’s include()
function (in the end, Puppet will declare the profiles::london::base,
profiles::london::network, and profiles::tomcat::application2 classes). Puppet
puts the contents of these classes into the catalog, and away we go. This is
awesome because you can change the classification of a node conditionally
according to a Hiera lookup, and it’s terrible because you can CHANGE THE
CLASSIFICATION OF A NODE CONDITIONALLY ACCORDING TO A HIERA LOOKUP! This means
that anyone with access to the repo holding your Hiera data files can affect
changes to every node in Puppet just by modifying a magical key. It also means
that in order to see the classification for a node, you need to do a Hiera
lookup (i.e. you can’t just open a file and see it).
Remember that WHOLE blog post about Roles and Profiles? I do, because I wrote
the damn thing. You can even go back and read it again, too, if you want to.
One of the core tenets of that article was that each node get classified with a
single role. If you adhere to that (and you should; it makes for a much more
logical Puppet deployment), a node really only ever needs to be classified
ONCE. You don’t NEED this conditional classification behavior. It’s one of those
“It seemed like a good idea at the time” moments that I assure you will pass.
Now, you CAN use Roles with hiera_include() – simply create a Facter fact that
returns the node’s role, add a level to the Hiera hierarchy for this role fact,
and in the role’s YAML file in Hiera, simply do:
appserver.yaml
1
classes:role::application_server
Then you can use the same hiera_include() call in the default node definition
in site.pp. The ONLY time I recommend this is if you don’t already have some
other classification method. The downside of this method is that if your role
fact CHANGES, for some reason or another, classification immediately changes.
Facts are NOT secure – they can be overridden really easily. I don’t like to
leave classification to an insecure method that anyone with root access on a
machine can change. Using an ENC or site.pp for classification means that the
node ABSOLUTELY CANNOT override its classification. It’s the difference between
being authoritative and simply ‘suggesting’ a classification.
PROS:
Dynamic classification: no need to maintain a site.pp file or group in the Console
Fact-based: a node’s classification can change immediately when its role fact does
CONS:
Decreased visibility: need to do a Hiera lookup to determine classification
Insecure: since facts are insecure and can be overridden, so can classification
This year at Puppetconf 2014, I presented a 1.5 hour talk entitled “The Refactor
Dance” that comprised nearly EVERYTHING that I’ve written about in my Puppet
Workflows series (from writing better component modules, to Roles/Profiles,
to Workflow, and lots of stories in-between) as well as a couple of bad words,
a pair of leather pants (trousers), and an Uber story that beats your Uber
story. It’s long, informative, and you get to watch the sweat stains under my
arms grow in an attractive grey Puppet Labs shirt. What’s not to love?
This blog post was born out of a number of conversations that I’ve had about
Puppet, its dependency model, and why ‘ordering’ is not necessarily the way to
think about dependencies when writing Puppet manifests. Like most everything on
this site, I’m getting it down in a file so I don’t have to repeat this all over
again the next time someone asks. Instead, I can point them to this page (and,
when they don’t actually READ this page, I can end up explaining everything
I’ve written here anyways…).
Before we go any further, let me define a couple of terms:
12345678910111213141516171819202122
dependencies     - In a nutshell, what happens when you use the metaparameters of
                   'before', 'require', 'subscribe' or 'notify' on resources in a
                   Puppet manifest: it's a chain of resources that are to be
                   evaluted in a specific order every time Puppet runs. Any failure
                   of a resource in this chain stops Puppet from evaluating the
                   remaining resources in the chain.

evaluate         - When Puppet determines the 'is' value (or current state) of a
                   resource (i.e. for package resources, "is the package installed?")

remediate        - When Puppet determines that the 'is' value (or current state of
                   the resource) is different from the 'should' value (or the value
                   entered into the Puppet manifest...the way the resource SHOULD
                   end up looking on the system) and Puppet needs to make a change.

declarative(ish) - When I use the word 'declarative(ish)', I mean that the order
                   by which Puppet evaluates resources that do not contain dependencies
                   does not have a set procedure/order. The way Puppet EVALUATES
                   resources does not have a set procedure/order, but the order
                   that Puppet reads/parses manifest files IS from top-to-bottom
                   (which is why variables in Puppet manifests need to be declared
                   before they can be used).
Why Puppet doesn’t care about execution order (until it does)
The biggest shock to the system when getting started with a declarative (ish)
configuration management tool like Puppet is understanding that Puppet describes
the end-state of the machine, and NOT the order that it’s (Puppet) going to
take you to that state. To Puppet, the order that it chooses to affect change
in any resource (be it a file to be corrected, a package to be installed, or
any other resource type) is entirely arbitrary because resources that have no
relationship to another resource shouldn’t CARE about the order in which they’re
evaluated and remediated.
For example, imagine Puppet is going to create both /etc/sudoers and update
the system’s authorized keys file to enter all the sysadmins’ SSH keys. Which
one should it do first? In an imperative system like shell scripts or
a runbook-style system, you are forced to choose an order. So I ask again,
which one goes first? If you try to update the sudoers file in your script
first, and there’s a problem with that update, then the script fails and the
SSH keys aren’t installed. If you switch the order and there’s a problem with
the SSH keys, then you can’t sudo up because the sudoers file hasn’t been
touched.
Because of this, Puppet has always taken the stance that if there are failures,
we want to get as much of the system into a working state as possible (i.e. any
resources that don’t depend upon the failing resource are going to still be
evaluated, or ‘inspected’, and remediated, or ‘changed if need be’). There are
definitely philosophical differences here: the argument can be made that if there’s
a failure somewhere, the system is bad and you should cast it off until you’ve
fixed whatever the problem is (or the part of the code causing the problem). In
virtualized or ‘cloud’ environments where everything is automated, this is just
fine, but in environments without complete and full automation, sometimes you
have to fix and deal with what you have. Puppet “believes in your system”, which
is borderline marketing-doubletalk for “alert you of errors and give you time
to fix the damn thing and do another Puppet run without having to spin up a whole
new system.”
Once you know WHY Puppet takes the stance it does, you realize that Puppet does
not give two shits about the order of resources without dependencies. If you
write perfect Puppet code, you’re fine. But the majority of the
known-good-world does not do that. In fact, most of us write shit code. Which
was the problem…
The history of Puppet’s ordering choices
‘Random’ random order
In the early days, the only resources that were guaranteed to have a consistent
order were those resources with dependencies (i.e. as I stated above, resources
that used the ‘before’, ‘require’, ‘subscribe’, or ‘notify’ metaparameters to
establish an evaluation order). Every other resource was evaluted at random
every time that Puppet ran…which meant that you could run Puppet ten times
and, theoretically, resources without dependencies could be evaluated in
a different order between every Puppet run (we call this non-deterministic
ordering). This made things REALLY hard to debug. Take the case where you had
a catalog of thousands of resources but you forgot a SINGLE dependency between
a couple of file resources. If you roll that change out to 1000 nodes, you
might have 10 or less of them fail (because Puppet chose an evaluation order
that ordered these two resources incorrectly). Imagine trying to figure out
what happened and replicate the problem. You could waste lots of time just
trying to REPLICATE the issue, even if it was a small fix like this.
PROS:
IS there a pro here?
CONS:
Ordering could change between runs, and thus it was very hard to debug missing dependencies
Philosophically, we were correct: resources that are to be evaluated in a certain
order require dependencies. Practically, we were creating more work for ourselves.
Incidentally, I’d heard that Adam Jacob, who created Chef, had cited this reason
as one of the main motivators for creating Chef. I’d heard that as a Puppet
consultant, he would run into these buried dependency errors and want to flip
tables. Even if it’s not a true STORY, it was absolutely true for tables where
I used to work…
Title-hash, ‘Predictable’ random order
Cut to Puppet version 2.7 where we introduced deterministic ordering with
‘title-hash’ ordering. In a nutshell, resources that didn’t have dependencies
would still be executed in a random order, but the order Puppet chose could be
replicated (it created a SHA1 hash based on the titles of the resources without
dependencies, and ordered the hashes alphabetically). This meant that if you
tested out a catalog on a node, and then ran that same catalog on 1000 other
nodes, Puppet would choose the same order for all 1000 of the nodes. This
gave you the ability to actually TEST whether your changes would successfully
run in production. If you omitted a dependency, but Puppet managed to pick the
correct evaluation order, you STILL had a missing dependency, but you didn’t
care about it because the code worked. The next change you made to the catalog
(by adding or removing resources), the order might change, but you would
discover and fix the dependency at that time.
PROS:
‘Predictable’ and repeatable order made testing possible
CONS:
Easy to miss dependency omissions if Puppet chose the right order (but do you really care?)
Manifest ordering, the ‘bath salts’ of ordering
Title-hash ordering seemed like the best of both worlds – being opinionated about
resource dependencies but also giving sysadmins a reliable, and repeatable, way
to test evaluation order before it’s pushed out to production.
Buuuuuuuuuut, y’all JUST weren’t happy enough, were you?
When you move from an imperative solution like scripts to a declarative(ish)
solution like Puppet, it is absolutely a new way to think about modeling your
system. Frequently we heard that people were having issues with Puppet because
the order that resources shows up in a Puppet master WASN’T the order that Puppet
would evaluate the resources. I just dropped a LOT of words explaining why this
isn’t the case, but who really has the time to read up on all of this? People
were dismissing Puppet too quickly because their expectations of how the tool
worked didn’t align with reality. The assumption, then, was to align these
expectations in the hopes that people wouldn’t dismiss Puppet so quickly.
Eric Sorenson wrote a blog post on our thesis and experimentation
around manifest ordering that is worth a read (and, incidentally, is shorter
than this damn post), but the short version is that we tested this theory out
and determined that Manifest Ordering would help new users to Puppet. Because
of this work, we created a feature called ‘Manifest Ordering’ that stated that
resources that DID NOT HAVE DEPENDENCIES would be evaluated by Puppet in the
order that they showed up in the Puppet manifest (when read top to bottom). If
a resource truly does not have any dependencies, then you honestly should not
care one bit what order it’s evaluated (because it doesn’t matter). Manifest
Ordering made ordering of resources without dependencies VERY predictable.
But….
This doesn’t mean I think it’s the best thing in the world. In fact, I’m really
wary of how I feel people will come to use Manifest Ordering. There’s a reason
I called it the “bath salts of ordering” – because a little bit of it, when
used correctly, can be a lovely thing, but too much of it, used in unintended
circumstances, leads to hypothermia, paranoia, and the desire to gnaw someone
else’s face off. We were/are giving you a way to bypass our dependency model by
using the mental-model you had with scripts, but ALSO telling you NOT to rely
on that mental-model (and instead set dependencies explicitly using metaparameters).
Seriously, what could go wrong?
Manifest Ordering is not a substitution for setting dependencies – that IS NOT
what it was created for. Puppet Labs still maintains that you should use
dependencies to order resources and NOT simply rely on Manifest Ordering as
a form of setting dependencies! Again, the problem is that you need to KNOW
this…and if Manifest Ordering allows you to keep the same imperative
“mindset” inside a declarative(ish) language, then eventually you’re going to
experience pain (if not today, but possibly later when you actually try to
refactor code, or share code, or use this code on a system that ISN’T using
Manifest Ordering). A declarative(ish) language like Puppet requires seeing
your systems according to the way their end-state will look and worrying about
WHAT the system will look like, and not necessarily HOW it will get there. Any
shortcut to understanding this process means you’re going to miss key bits of
what makes Puppet a good tool for modeling this state.
PROS:
Evaluation order of resources without dependencies is absolutely predictable
CONS:
If used as a substitution for setting dependencies, then refactoring code (moving around the order in which resources show up in a manifest) means changing the evaluation order
What should I actually take from this?
Okay, here’s a list of things you SHOULD be doing if you don’t want to create
a problem for future-you or future-organization:
Use dependency metaparameters like ‘before’, ‘require’, ‘notify’, and ‘subscribe’ if resources in a catalog NEED to be evaluated in a particular order
Do not use Manifest Ordering as a substitute for explicitly setting dependencies (disable it if this is too tempting)
Use Roles and Profiles for a logical module layout (see: http://bit.ly/puppetworkflows2 for information on Roles and Profiles)
Order individual components inside the Profile
Order Profiles (if necessary) inside the Role
And, seriously, trust us with the explicit dependencies. It seems like a giant
pain in the ass initially, but you’re ultimately documenting your infrastructure,
and a dependency (or, saying ‘this thing MUST come before that thing’) is a pretty
important decision. There’s a REASON behind it – treat it with some more weight
other than having one line come before another line, ya know? The extra time
right now is absolutely going to buy you the time you spend at home with your
kids (and by ‘kids’, I mean ‘XBox’).
If you’ve read anything I’ve posted in the past year, you know my feelings about
the word ‘environments’ and about how well we tend to name things here at
Puppet Labs (and if you don’t, you can check out that post here).
Since then, Puppet Labs has released a new feature called directory
environments (click this link for further reading)
that replace the older ‘config file environments’ that we all used to use (i.e.
stanzas in puppet.conf). Directory environments weren’t without their false
starts and issues, but further releases of Puppet, and their inclusion in
Puppet Enterprise 3.3.0, have allowed more people
to ask about them. SO, I thought I’d do a quick writeup about them…
R10k had a child: Directory Environments
The Puppet platform team had a couple of problems with config file environments
in puppet.conf – namely:
Entering them in puppet.conf meant that you couldn’t use environments named ‘master’, ‘main’, or ‘agent’
There was no easy/reliable way to determine all the available/used Puppet environments without making assumptions (and hacky code) – especially if someone were using R10k + dynamic environments
Adding more environments to puppet.conf made managing that file something of a nightmare (environments.d anyone?)
Combine this with the fact that most of the Professional Services team was
rolling out R10k to create dynamic environments (which meant we
were abusing $environment inside puppet.conf and creating environments…well…
dynamically and on-the-fly), and they knew something needed to be done.
Because R10k was so popular and widely deployed, an environment solution that
was a simple step-up from an R10k deployment was made the target, and directory
environments were born.
How does it work?
Directory environments, essentially, are born out of a folder on the Puppet master
(typically $confdir/environments, where $confdir is /etc/puppetlabs/puppet
in Puppet Enterprise) wherein every subfolder is a new Puppet environment. Every
subfolder contains a couple of key items:
A modules folder containing all modules for that environment
A manifests/site.pp file containing the site.pp file for that environment
A new environment.conf file which can be used to set the modulepath, the environment_timeout, and, a new and often-requested feature, the ability to have environment-specific config_version settings
It wouldn’t be one of my blog posts if it didn’t include exact steps to configure
shit, would it? For this walkthrough, I’m using a Centos 6.5 vm with DNS working
(i.e. the node can ping itself and knows its own hostname and FQDN), and I’ve
already installed an All-in-one installation of Puppet Enterprise 3.3.0. For
the walkthrough, we’re going to setup:
Directory environments based on a control repo
Hiera data inside a hieradata folder in the control repo
Hiera to use the per-environment hieradata folder
Let’s start to break down the components:
The ‘Control Repo’?
Sometime between my initial R10k post and THIS post, the Puppet Labs PS
team has come to call the repository that contains the Puppetfile and is used
to track Puppet environments on all Puppet masters the ‘Control Repo’ (because
it ‘Controls the creation of Puppet environments’, ya dig? Zack Smith and
James Sweeny are actually pretty tickled about making that name stick). For
the purpose of this demonstration, I’m using a repository on Github:
Everything you will need for this walkthrough is in that repository, and we
will refer to it frequently. You DO NOT need to use my repository, and it’s
definitely going to be required that you create your OWN, but it’s there
for reference purposes (and to give you a couple of Puppet manifests to
make setup a bit easier).
Configuring the Puppet master
We’re going to first clone my control repo to /tmp so we can use it to
configure R10k and the Puppet master itself:
Great, I’ve cloned my repo. To configure R10k, we’re going to need to pull
down Zack Smith’s R10k module from the forge with puppet module install zack/r10k
and then use puppet apply on a manifest in my repo with
puppet apply configure_r10k.pp. DO NOTE: If you want to use YOUR Control
Repo, and NOT the one I use on Github, then you need to modify the
configure_r10k.pp file and replace the remote property with the URL to
YOUR Control Repo that’s housed on a git repository!
[root@master /tmp/puppet_repository:production]# puppet module install zack/r10k

Notice: Preparing to install into /etc/puppetlabs/puppet/modules ...
Notice: Downloading from https://forgeapi.puppetlabs.com ...
Notice: Found at least one version of puppetlabs-stdlib compatible with PE (3.3.0);
Notice: Skipping versions which don't express PE compatibility. To install
the most recent version of the module regardless of compatibility
with PE, use the '--ignore-requirements' flag.
Notice: Found at least one version of puppetlabs-inifile compatible with PE (3.3.0);
Notice: Skipping versions which don't express PE compatibility. To install
the most recent version of the module regardless of compatibility
with PE, use the '--ignore-requirements' flag.
Notice: Found at least one version of puppetlabs-vcsrepo compatible with PE (3.3.0);
Notice: Skipping versions which don't express PE compatibility. To install
the most recent version of the module regardless of compatibility
with PE, use the '--ignore-requirements' flag.
Notice: Found at least one version of puppetlabs-concat compatible with PE (3.3.0);
Notice: Skipping versions which don't express PE compatibility. To install
the most recent version of the module regardless of compatibility
with PE, use the '--ignore-requirements' flag.
Notice: Installing -- do not interrupt ...
/etc/puppetlabs/puppet/modules
└─┬ zack-r10k (v2.2.7)
  ├─┬ gentoo-portage (v2.2.0)
  │ └── puppetlabs-concat (v1.0.3) [/opt/puppet/share/puppet/modules]
  ├── mhuffnagle-make (v0.0.2)
  ├── puppetlabs-gcc (v0.2.0)
  ├── puppetlabs-git (v0.2.0)
  ├── puppetlabs-inifile (v1.1.0) [/opt/puppet/share/puppet/modules]
  ├── puppetlabs-pe_gem (v0.0.1)
  ├── puppetlabs-ruby (v0.2.1)
  ├── puppetlabs-stdlib (v3.2.2) [/opt/puppet/share/puppet/modules]
  └── puppetlabs-vcsrepo (v1.1.0)

[root@master /tmp/puppet_repository:production]# puppet apply configure_r10k.pp

Notice: Compiled catalog for master.puppetlabs.vm in environment production in 0.71 seconds
Warning: The package type's allow_virtual parameter will be changing its default value from false to true in a future release. If you do not want to allow virtual packages, please explicitly set allow_virtual to false.
   (at /opt/puppet/lib/ruby/site_ruby/1.9.1/puppet/type.rb:816:in `set_default')
Notice: /Stage[main]/R10k::Install/Package[r10k]/ensure: created
Notice: /Stage[main]/R10k::Install::Pe_gem/File[/usr/bin/r10k]/ensure: created
Notice: /Stage[main]/R10k::Config/File[r10k.yaml]/ensure: defined content as '{md5}5cda58e8a01e7ff12544d30105d13a2a'
Notice: Finished catalog run in 11.24 seconds
Performing those commands will successfully setup R10k to point to my Control
Repo out on Github (and, again, if you don’t WANT that, then you need to make
the change to the remote property in configure_r10k.pp). We next need to
configure Directory Environments in puppet.conf by setting two attributes:
environmentpath (Or the path to the folder containing environments)
basemodulepath (Or, the set of modules that will be shared across ALL ENVIRONMENTS)
I have created a Puppet manifest that will set these attributes, and this
manifest requires the puppetlabs/inifile module from the Puppet Forge.
Fortunately, since I’m using Puppet Enterprise, that module is already installed.
If you’re using open source Puppet and the module is NOT installed, feel free
to install it by running puppet module install puppetlabs/inifile. Once
this is done, go ahead and execute the manifest by running
puppet apply configure_directory_environments.pp:
123456
[root@master /tmp/puppet_repository:production]# puppet apply configure_directory_environments.pp

Notice: Compiled catalog for master.puppetlabs.vm in environment production in 0.05 seconds
Notice: /Stage[main]/Main/Ini_setting[Configure environmentpath]/ensure: created
Notice: /Stage[main]/Main/Ini_setting[Configure basemodulepath]/value: value changed '/etc/puppetlabs/puppet/modules:/opt/puppet/share/puppet/modules' to '$confdir/modules:/opt/puppet/share/puppet/modules'
Notice: Finished catalog run in 0.20 seconds
The last step to configuring the Puppet master is to execute an R10k run.
We can do that by running r10k deploy environment -pv:
12345678910111213141516171819202122232425262728
[root@master /tmp/puppet_repository:production]# r10k deploy environment -pv

[R10K::Source::Git - INFO] Determining current branches for "https://github.com/glarizza/puppet_repository.git"
[R10K::Task::Environment::Deploy - NOTICE] Deploying environment production
[R10K::Task::Puppetfile::Sync - INFO] Loading modules from Puppetfile into queue
[R10K::Task::Module::Sync - INFO] Deploying profiles into /etc/puppetlabs/puppet/environments/production/modules
[R10K::Task::Module::Sync - INFO] Deploying notifyme into /etc/puppetlabs/puppet/environments/production/modules
[R10K::Task::Module::Sync - INFO] Deploying ntp into /etc/puppetlabs/puppet/environments/production/modules
[R10K::Task::Module::Sync - INFO] Deploying apache into /etc/puppetlabs/puppet/environments/production/modules
[R10K::Task::Environment::Deploy - NOTICE] Deploying environment webinar_env
[R10K::Task::Puppetfile::Sync - INFO] Loading modules from Puppetfile into queue
[R10K::Task::Module::Sync - INFO] Deploying profiles into /etc/puppetlabs/puppet/environments/webinar_env/modules
[R10K::Task::Module::Sync - INFO] Deploying notifyme into /etc/puppetlabs/puppet/environments/webinar_env/modules
[R10K::Task::Module::Sync - INFO] Deploying haproxy into /etc/puppetlabs/puppet/environments/webinar_env/modules
[R10K::Task::Module::Sync - INFO] Deploying mysql into /etc/puppetlabs/puppet/environments/webinar_env/modules
[R10K::Task::Module::Sync - INFO] Deploying ntp into /etc/puppetlabs/puppet/environments/webinar_env/modules
[R10K::Task::Module::Sync - INFO] Deploying apache into /etc/puppetlabs/puppet/environments/webinar_env/modules
[R10K::Task::Deployment::PurgeEnvironments - INFO] Purging stale environments from /etc/puppetlabs/puppet/environments
Great! Everything should be setup (if you’re using my repo)! My repository has
a production branch, which is what Puppet’s default environment is named,
so we can test that everything works by listing out all modules in the main
production environment with the puppet module list command:
First, I’ve got some dependency issues…oh well, nothing that’s a game-stopper
Second, the path to the production environment’s module is correct at: /etc/puppetlabs/puppet/environments/production/modules
Configuring Hiera
The last dinghy to be configured on this dreamboat is Hiera. Hiera is Puppet’s
data lookup mechanism, and is used to gather specific bits of data (such
as versions of packages, hostnames, passwords, and other business-specific
data). Explaining HOW Hiera works is beyond the scope of this article, but
configuring Hiera data on a per-environment basis IS absolutely a worthwhile
endeavor.
In this example, I’m going to demonstrate coupling Hiera data with the Control
Repo for simple replication of Hiera data across environments. You COULD also
choose to put your Hiera data in a separate repository and set it up in
/etc/r10k.yaml as another source, but that exercise is left to the reader
(and if you’re interested, I talk about it in this post).
You’ll notice that my demonstration repository ALREADY includes Hiera data,
and so that data is automatically being replicated to all environments. By
default, Hiera’s configuration file (hiera.yaml) has no YAML data directory
specified, so we’ll need to make that change. In my demonstration control
repository, I’ve included a sample hiera.yaml, but let’s take a look at
one below:
12345678910111213141516
## /etc/puppetlabs/puppet/hiera.yaml---:backends:-yaml:hierarchy:-"%{clientcert}"-"%{application_tier}"-common:yaml:# datadir is empty here, so hiera uses its defaults:# - /var/lib/hiera on *nix# - %CommonAppData%\PuppetLabs\hiera\var on Windows# When specifying a datadir, make sure the directory exists.:datadir:"/etc/puppetlabs/puppet/environments/%{environment}/hieradata"
This hiera.yaml file specifies a hierarchy with three levels – a node-specific,
level, a level for different application tiers (like ‘dev’, ‘test’, ‘prod’, and
etc), and finally makes the change we need: mapping the data directory to each
environment’s hieradata folder. The path to hiera.yaml is Puppet’s
configuration directory (which is /etc/puppetlabs/puppet for Puppet
Enterprise, or /etc/puppet for the open source version of Puppet), so open
the file there, make your changes, and finally you’ll need to need to restart
the Puppet master service to have the changes picked up.
Next, let’s perform a test by executing the hiera binary from the command
line before running puppet:
12345678910111213141516
[root@master /etc/puppetlabs/puppet/environments]# hiera message environment=productionThis node is using common data[root@master /etc/puppetlabs/puppet/environments]# hiera message environment=webinar_env -dDEBUG:2014-08-31 19:55:44 +0000:Hiera YAML backend startingDEBUG:2014-08-31 19:55:44 +0000:Looking up message in YAML backendDEBUG:2014-08-31 19:55:44 +0000:Looking for data source commonDEBUG:2014-08-31 19:55:44 +0000:Found message in commonThis node is using common data[root@master /etc/puppetlabs/puppet/environments]# hiera message environment=bad_env -dDEBUG:2014-08-31 19:58:22 +0000:Hiera YAML backend startingDEBUG:2014-08-31 19:58:22 +0000:Looking up message in YAML backendDEBUG:2014-08-31 19:58:22 +0000:Looking for data source commonDEBUG:2014-08-31 19:58:22 +0000:Cannot find datafile /etc/puppetlabs/puppet/environments/bad_env/hieradata/common.yaml, skippingnil
You can see that for the first example, I passed the environment of production
and did a simple lookup for a key called message – Hiera then returned me
the value of out that environment’s common.yaml file. Next, I did another
lookup, but added -d to enable debug mode (debug mode on the hiera
binary is REALLY handy for debugging problems with Hiera – combine it with
specifying values from the command line, and you can pretty quickly simulate
what value a node is going to get). Notice the last example where I specified
an invalid environment – Hiera logged that it couldn’t find the datafile
requested and ultimately returned a nil, or empty, value.
Since we’re working on the Puppet master machine, we can even check for a value
using puppet apply combined with the notice function:
1234
[root@master /etc/puppetlabs/puppet/environments]# puppet apply -e "notice(hiera('message'))"Notice:Scope(Class[main]):This node is using common dataNotice:Compiled catalog for master.puppetlabs.vm in environment production in 0.09 secondsNotice:Finished catalog run in 0.19 seconds
Great, it’s working, but let’s look at pulling data from a higher level in the
hierarchy – like from the application_tier level. We haven’t defined an
application_tier fact, however, so we’ll need to fake it. First, let’s do
that with the hiera binary:
123456
[root@master /etc/puppetlabs/puppet/environments]# hiera message environment=production application_tier=dev -dDEBUG:2014-08-31 20:04:12 +0000:Hiera YAML backend startingDEBUG:2014-08-31 20:04:12 +0000:Looking up message in YAML backendDEBUG:2014-08-31 20:04:12 +0000:Looking for data source devDEBUG:2014-08-31 20:04:12 +0000:Found message in devYou are in the development application tier
And then also with puppet apply:
1234
[root@master /etc/puppetlabs/puppet/environments]# FACTER_application_tier=dev puppet apply -e "notice(hiera('message'))"Notice:Scope(Class[main]):You are in the development application tierNotice:Compiled catalog for master.puppetlabs.vm in environment production in 0.09 secondsNotice:Finished catalog run in 0.18 seconds
Tuning environment.conf
The brand-new, per-environment environment.conf file is meant to be (for
the most part) a one-stop-shop for your Puppet environment tuning needs. Right
now, the only things you’ll need to tune will be the modulepath,
config_version, and possibly the environment_timeout.
Module path
Before directory environments, every environment had its own modulepath that
needed to be tuned to allow for modules that were to be used by this
machine/environment, as well as shared modules. That modulepath worked like
$PATH in that it was a priority-based lookup for modules (i.e. the first
directory in modulepath that had a module matching the module name you wanted
won). It also previously required the FULL path to be used for every path in
modulepath.
Those days are over.
As I mentioned before, the main puppet.conf configuration file has a new
parameter called basemodulepath that can be used to specify modules that are
to be shared across ALL modules in ALL environments. Paths defined here
(typically $confdir/modules and /opt/puppet/share/puppet/modules) are
usually put at the END of a modulepath so Puppet can search for any
overridden modules that show up in earlier modulepath paths. In the previous
configuration steps, we executed a manifest that setup basemodulepath to
look like:
Again, feel free to add or remove paths (except don’t remove
/opt/puppet/share/puppet/modules if you’re using Puppet Enterprise, because
that’s where all Puppet Enterprise modules are located), especially if you’re
using a giant monolithic repo of modules (which was typically done before things
like R10k evolved).
With basemodulepath configured, it’s now time to configure the modulepath
to be defined for every environment. My demonstration control repo contains
a sample environment.conf that defines a modulepath like so:
1
modulepath = modules:$basemodulepath
You’ll notice, now, that there are relative paths in modulepath. This is
possible because now each environment contains an environment.conf, and thus
relative paths make sense. In this example, nodes in the production environment
(/etc/puppetlabs/puppet/environments/production) will look for a module by its
name FIRST by looking in a folder called modules inside the current
environment folder (i.e. /etc/puppetlabs/puppet/environments/production/modules/<module_name>).
If the module wasn’t found there, it looks for the module in the order that
paths are defined for basemodulepath above. If Puppet fails to find a module
in ANY of the paths, a compile error is raised.
Per-environment config_version
Setting config_version has been around for awhile – hell,
I remember video of Jeff McCune talking about it at the first Puppetcamp Europe
in like 2010 – but the new directory environments implementation has fine
tuned it a bit. Previously, config_version was a command executed on the
Puppet master at compile time to determine a string used for versioning the
configuration enforced during that Puppet run. When it’s not set it defaults
to something of a time/date stamp off the parser, but it’s way more useful to
make it do something like determine the most recent commit hash from a repository.
In the past when we used a giant monolithic repository containing all Puppet
modules, it was SUPER easy to get a single commit hash and be done. As everyone
moved their modules into individual repositories, determining WHAT you were
enforcing became harder. With the birth of R10k an the control repo, we
suddenly had something we could query for the state of our modules being
enforced. The problem existed, though, that with multiple dynamic environments
using multiple git branches, config_version wasn’t easily tuned to be able
to grab the most recent commit from every branch.
Now that config_version is set in a per-environment environment.conf, we
can make config_version much smarter. Again, looking in the environment.conf
defined in my demonstration control repo produces this:
This setting will cause the Puppet master to produce the most recent commit ID
for whatever environment you’re in and embed it in the catalog and the report
that is sent back to the Puppet master after a Puppet run.
I actually discovered a bug in config_version while writing this post,
and it’s that config_version is subject to the relative pathing fun that other
environment.conf settings are subject to. Relative pathing is great for things like
modulepath, and it’s even good for config_version if you’re including the
script you want to run to gather the config_version string inside the control
repo, but using a one-line command that tries to execute a binary on the system
that DOESN’T include the full path to the binary causes an error (because Puppet
attempts to look for that binary in the current environment path, and NOT by
searching $PATH on the system). Feel free to follow or comment on the bug
if the mood hits you.
Caching and environment_timeout
The Puppet master loads environments on-request, but it also caches data associated
with each environment to make things faster. This caching is finally tunable on a
per-environment basis by defining the environment_timeout setting in
environment.conf. The default setting is 3 minutes, which means the Puppet master
will invalidate its caches and reload environment data every 3 minutes, but that’s
now tunable. Definitely read up on this setting before making changes.
Classification
One of the last new features of directory environments is the ability to include
an environment-specific site.pp file for classification. You could ALWAYS do
this by modifying the manifest configuration item in puppet.conf, but now
each environment can have its own manifest setting. The default behavior is
to have the Puppet master look for manifests/site.pp in every environment
directory, and I really wouldn’t change that unless you have a good reason. DO
NOTE, however, that if you’re using Puppet Enterprise, you’ll need to be careful
with your site.pp file. Puppet Enterprise defines things like the Filebucket
and overrides for the File resource in site.pp, so if you’re using Puppet Enterprise,
you’ll need to copy those changes into the site.pp file you add into your control
repo (as I did).
It may take you a couple of times to change your thinking from looking at the main
site.pp in $confdir/manifests to looking at each environment-specific site.pp
file, but definitely take advantage of Puppet’s commandline tool to help you track
which site.pp Puppet is monitoring:
You can see that puppet config print can be used to get the path to the
directory that contains site.pp. Even cooler is what happens when you
specify an environment that doesn’t exist:
Yep, Puppet tells you if it can’t find the manifest file. That’s pretty cool.
Wrapping Up
Even though the new implementation of directory environments is meant to map
closely to a workflow most of us have been using (if you’ve been using R10k, that is),
there are still some new features that may take you by surprise. Hopefully this
post gets you started with just enough information to setup your own test
environment and start playing. PLEASE DO make sure to file bugs on any behavior
that comes as unexpected or stops you from using your existing workflow. Cheers!
There have been more than a couple of moments where I’m on-site with a customer
who asks a seemingly simple question and I’ve gone “Oh shit; that’s a great
question and I’ve never thought of that…” Usually that’s followed by me
changing up the workflow and immediately regretting things I’ve done on prior
gigs. Some people call that ‘agile’; I call it ‘me not having the
forethought to consider conditions properly’.
‘Environment’, like ‘scaling’, ‘agent’, and ‘test’, has many meanings
It’s not a secret that we’ve made some shitty decisions in the past with regard
to naming things in Puppet (and anyone who asks me what puppet agent -t
stands for usually gets a heavy sigh, a shaken head, and an explanation emitted
in dulcet, apologetic tones). It’s also very easy to conflate certain concepts
that unfortunately share very common labels (quick – what’s the difference
between properties and parameters, and give me the lowdown on MCollective
agents versus Puppet agents!).
And then we have ‘environments’ + Hiera + R10k.
Puppet ‘environments’
Puppet has the concept of ‘environments’, which, to me, exist to provide a
means of compiling a catalog using different paths to Puppet modules on the
Puppet master. Using a Puppet environment is the same as saying “I made some
changes to my tomcat class, but I don’t want to push it DIRECTLY to my production
machines yet because I don’t drink Dos Equis. It would be great if I could stick
this code somewhere and have a couple of my nodes test how it works before
merging it in!”
Puppet environments suffer some ‘seepage’ issues,
which you can read about here, but do a reasonable job of quickly
testing out changes you’ve made to the Puppet DSL (as opposed to custom
plugins, as detailed in the bug). Puppet environments work well when you
need a pipeline for testing your Puppet code (again, when you’re refactoring
or adding new functionality), and using them for that purpose is great.
Internal ‘environments’
What I consider ‘internal environments’ have a couple of names – sometimes
they’re referred to as application or deployment gateways, sometimes as ‘tiers’, but
in general they’re long-term groupings that machines/nodes are attached to
(usually for the purpose of phased-out application deployments). They
frequently have names such as ‘dev’, ‘test’, ‘prod’, ‘qa’, ‘uat’, and the
like.
For the purpose of distinguishing them from Puppet environments, I’m going to
refer to them as ‘application tiers’ or just ‘tiers’ because, fuck it, it’s a
word.
Making both of them work
The problems with having Puppet environments and application tiers are:
Puppet environments are usually assigned to a node for short periods of time,
while application tiers are usually assigned to a node for the life of the node.
Application tiers usually need different bits of data (i.e. NTP server
addresses, versions of packages, etc), while Puppet environments usually
use/involve differences to the Puppet DSL.
Similarly to the first point, the goal of Puppet environments is to eventually
merge code differences into the main production Puppet environment. Application
tiers, however, may always have differences about them and never become unified.
You can see where this would be problematic – especially when you might want to
do things like use different Hiera values between different application tiers,
but you want to TEST out those values before applying them to all nodes in an
application tier. If you previously didn’t have a way to separate Puppet
environments from application tiers, and you used R10k to generate Puppet
environments, you would have things like long-term branches in your repositories
that would make it difficult/annoying to manage.
NOTE: This is all assuming you’re managing component modules, Hiera data,
and Puppet environments using R10k.
The first step in making both monikers work together is to have two separate
variables in Puppet – namely $environment for Puppet environments, and
something ELSE (say, $tier) for the application tier. The “something else” is
going to depend on how your workflow works. For example, do you have something
centrally that can correlate nodes to the tier in which they belong? If so, you
can write a custom fact that will query that service. If you don’t have this
magical service, you can always just attach an application tier to a node in
your classification service (i.e. the Puppet Enterprise Console or Foreman).
Failing both of those, you can look to external facts. External Fact
support was introduced into Facter 1.7 (but Puppet Enterprise has supported
them through the standard lib for quite awhile). External facts give you the
ability to create a text file inside the facts.d directory in the format of:
12
tier=qa
location=portland
Facter will read this text file and store the values as facts for a Puppet run,
so $tier will be qa and $location will be portland. This is handy for
when you have arbitrary information that can’t be easily discovered by the
node, but DOES need to be assigned for the node on a reasonably consistent
basis. Usually these files are created during the provisioning process, but
can also be managed by Puppet. At any rate, having $environment and $tier
available allow us to start to make decisions based on the values.
Branch with $environment, Hiera with $tier
Like we said above, Puppet environments are frequently short-term assignments,
while application tiers are usually long-term residencies. Relating those back
to the R10k workflow: branches to the main puppet repo (containing the
Puppetfile) are usually short-lived, while data in Hiera is usually
longer-lived. It would then make sense that the name of the branches to the
main puppet repo would resolve to being $environment (and thus the Puppet
environment name), and $tier (and thus the application tier) would be used
in the Hiera hierarchy for lookups of values that would remain different across
application tiers (like package versions, credentials, and etc…).
Wins:
Puppet environment names (like repository branch names) become relatively
meaningless and are the “means” to the end of getting Puppet code merged into
the PUPPET CODE’s production branch (i.e. code that has been tested to work
across all application tiers)
Puppet environments become short lived and thus have less opportunity to
deviate from the main production codebase
Differences across application tiers are locked in one place (Hiera)
Differences to Puppet DSL code (i.e. in Manifests) can be pushed up to the
profile level, and you have a fact ($tier) to catch those differences.
The ultimate reason why I’m writing about this is because I’ve seen people try
to incorporate both the Puppet environment and application tier into both the
environment name and/or the Hiera hierarchy. Many times, they run into all
kinds of unscalable issues (large hierarchies, many Puppet environments,
confusing testing paths to ‘production’). I tend to prefer this workflow
choice, but, like everything I write about, take it and model it toward what
works for you (because what works now may not work 6 months from now).
Thoughts?
Like I said before, I tend to discover new corner cases that change my mind
on things like this, so it’s quite possible that this theory isn’t the most
solid in the world. It HAS helped out some customers to clean up their code
and make for a cleaner pipeline, though, and that’s always a good thing. Feel
free to comment below – I look forward to making the process better for all!
In the last workflows post, I talked about dynamic Puppet
environments and introduced R10k, which is an awesome tool for mapping modules
to their environments which are dynamically generated by git branches. I didn’t
get out everything I wanted to say because:
I was tired of that post sitting stale in a Google Doc
It was already goddamn long
So because of that, consider this a continuation of that previous monstrosity
that talks about additional uses of R10k beyond the ordinary
Let’s talk Hiera
But seriously, let’s not actually talk about what Hiera does since
there are better docs out there for that. I’m
also not going to talk about WHEN to use Hiera because
I’ve already done that before. Instead, let’s talk about a workflow
for submitting changes to Hiera data and testing it out before it enters into
production.
Most people store their Hiera data (if they’re using a backend that reads Hiera
data from disk anyways) in separate repos as their Puppet repo. Some DO tie the
Hiera datadir folder to something like the main Puppet repo that houses their
Puppetfie (if they’re using R10k), but for the most part it’s a separate
repo because you may want separate permissions for accessing that data.
For the purposes of this post, I’m going to refer to
a repository I use for storing Hiera data that’s out on Github.
The next logical step would be to integrate that Hiera repo into R10k so R10k can
track and create paths for Hiera data just like it did for Puppet.
NOTE: Fundamentally, all that R10k does is checkout modules to a specific
path whose folder name comes from a git branch. PUPPET ties its environment
to this folder name with some puppet.conf trickery. So, to say that R10k
“creates dynamic environments” is the end-result, but not the actual job
of the tool.
We COULD add Hiera’s repository to the /etc/r10k.yaml file to track and
create folders for us, and if we did it EXACTLY like we did for Puppet we
would most definitely run into this R10k bug (AND,
it comes up again in this bug).
UPDATE: So, I originally wrote this post BEFORE R10k version 1.1.4 was
released. Finch released version 1.1.4 which FIXES THESE BUGS…so the workflow
I’m going to describe (i.e. using prefixing to solve the problem of using
multiple repos in /etc/r10k.yaml that could possibly share branch names)
TECHNICALLY does NOT need to be followed ‘to the T’, as it were. You can
disable prefixing when it comes to that step, and modify
/etc/puppetlabs/puppet/hiera.yaml so you don’t prepend ‘hiera_’ to the
path of each environment’s folder, and you should be totally fine…you know,
as long as you use version 1.1.4 or greater of R10k. So, be forewarned
The issue is those bugs is that R10k collects the names of ALL the environments
from ALL the sources at once, so if you have multiple source repositories and
they share branch names, then you have clashes (since it only stores ONE branch
name internally). The solution that Finch came up with was prefixing (or,
prefixing the name of the branch with the name of the source). When you prefix,
however, it creates a folder on-disk that matches the prefixed name (e.g.
NameOfTheSource_NameOfTheBranch ). This is actually fine since we’ll catch it
and deal with it, but you should be aware of it. Future versions of R10k may
most likely deal with this in a different manner, so make sure to check out the
R10k docs before blindly copying my code, okay? (Update: See the previous, bolded
paragraph where I describe how Finch DID JUST THAT).
In the previous post I setup a file called r10k_installation.pp
to setup R10k. Let’s revisit that manifest it and modify it for
my Hiera repo:
NOTE: For the duration of this post, I’ll be referring to Puppet Enterprise
specific paths (like /etc/puppetlabs/puppet for $confdir). Please do the
translation for open source Puppet, as R10k will work just fine with either
the open source edition or the Enterprise edition of Puppet
You’ll note that I added a source called ‘hiera’ that tracks my Hiera
repository, creates sub-folders in /etc/puppetlabs/puppet/hiera, and enables
prefixing to deal with the bug I mentioned in the previous paragraph. Now,
let’s run Puppet and do an R10k synchronization:
[root@master1 garysawesomeenvironment]# puppet apply /var/tmp/r10k_installation.pp
Notice: Compiled catalog for master1 in environment production in 1.78 seconds
Notice: /Stage[main]/R10k::Config/File[r10k.yaml]/content: content changed '{md5}c686917fcb572861429c83f1b67cfee5' to '{md5}69d38a14b5de0d9869ebd37922e7dec4'
Notice: Finished catalog run in 1.24 seconds

[root@master1 puppet]# r10k deploy environment -pv
[R10K::Task::Deployment::DeployEnvironments - INFO] Loading environments from all sources
[R10K::Task::Environment::Deploy - NOTICE] Deploying environment hiera_testing
[R10K::Task::Puppetfile::Sync - INFO] Loading modules from Puppetfile into queue
[R10K::Task::Environment::Deploy - NOTICE] Deploying environment hiera_production
[R10K::Task::Puppetfile::Sync - INFO] Loading modules from Puppetfile into queue
[R10K::Task::Environment::Deploy - NOTICE] Deploying environment hiera_master
[R10K::Task::Puppetfile::Sync - INFO] Loading modules from Puppetfile into queue
[R10K::Task::Environment::Deploy - NOTICE] Deploying environment production
[R10K::Task::Puppetfile::Sync - INFO] Loading modules from Puppetfile into queue
[R10K::Task::Module::Sync - INFO] Deploying notifyme into /etc/puppetlabs/puppet/environments/production/modules
[R10K::Task::Module::Sync - INFO] Deploying redis into /etc/puppetlabs/puppet/environments/production/modules
[R10K::Task::Module::Sync - INFO] Deploying property_list_key into /etc/puppetlabs/puppet/environments/production/modules
[R10K::Task::Module::Sync - INFO] Deploying wordpress into /etc/puppetlabs/puppet/environments/production/modules
[R10K::Task::Module::Sync - INFO] Deploying r10k into /etc/puppetlabs/puppet/environments/production/modules
[R10K::Task::Module::Sync - INFO] Deploying make into /etc/puppetlabs/puppet/environments/production/modules
[R10K::Task::Module::Sync - INFO] Deploying concat into /etc/puppetlabs/puppet/environments/production/modules
[R10K::Task::Module::Sync - INFO] Deploying vsftpd into /etc/puppetlabs/puppet/environments/production/modules
[R10K::Task::Module::Sync - INFO] Deploying portage into /etc/puppetlabs/puppet/environments/production/modules
[R10K::Task::Module::Sync - INFO] Deploying r10k into /etc/puppetlabs/puppet/environments/production/modules
[R10K::Task::Module::Sync - INFO] Deploying inifile into /etc/puppetlabs/puppet/environments/production/modules
[R10K::Task::Module::Sync - INFO] Deploying git into /etc/puppetlabs/puppet/environments/production/modules
[R10K::Task::Module::Sync - INFO] Deploying vcsrepo into /etc/puppetlabs/puppet/environments/production/modules
[R10K::Task::Module::Sync - INFO] Deploying firewall into /etc/puppetlabs/puppet/environments/production/modules
[R10K::Task::Module::Sync - INFO] Deploying ruby into /etc/puppetlabs/puppet/environments/production/modules
[R10K::Task::Module::Sync - INFO] Deploying mysql into /etc/puppetlabs/puppet/environments/production/modules
[R10K::Task::Module::Sync - INFO] Deploying pe_gem into /etc/puppetlabs/puppet/environments/production/modules
[R10K::Task::Module::Sync - INFO] Deploying apache into /etc/puppetlabs/puppet/environments/production/modules
[R10K::Task::Module::Sync - INFO] Deploying stdlib into /etc/puppetlabs/puppet/environments/production/modules
[R10K::Task::Environment::Deploy - NOTICE] Deploying environment master
[R10K::Task::Puppetfile::Sync - INFO] Loading modules from Puppetfile into queue
[R10K::Task::Module::Sync - INFO] Deploying redis into /etc/puppetlabs/puppet/environments/master/modules
[R10K::Task::Module::Sync - INFO] Deploying property_list_key into /etc/puppetlabs/puppet/environments/master/modules
[R10K::Task::Module::Sync - INFO] Deploying wordpress into /etc/puppetlabs/puppet/environments/master/modules
[R10K::Task::Module::Sync - INFO] Deploying vsftpd into /etc/puppetlabs/puppet/environments/master/modules
[R10K::Task::Module::Sync - INFO] Deploying portage into /etc/puppetlabs/puppet/environments/master/modules
[R10K::Task::Module::Sync - INFO] Deploying r10k into /etc/puppetlabs/puppet/environments/master/modules
[R10K::Task::Module::Sync - INFO] Deploying inifile into /etc/puppetlabs/puppet/environments/master/modules
[R10K::Task::Module::Sync - INFO] Deploying git into /etc/puppetlabs/puppet/environments/master/modules
[R10K::Task::Module::Sync - INFO] Deploying vcsrepo into /etc/puppetlabs/puppet/environments/master/modules
[R10K::Task::Module::Sync - INFO] Deploying firewall into /etc/puppetlabs/puppet/environments/master/modules
[R10K::Task::Module::Sync - INFO] Deploying mysql into /etc/puppetlabs/puppet/environments/master/modules
[R10K::Task::Module::Sync - INFO] Deploying pe_gem into /etc/puppetlabs/puppet/environments/master/modules
[R10K::Task::Module::Sync - INFO] Deploying apache into /etc/puppetlabs/puppet/environments/master/modules
[R10K::Task::Module::Sync - INFO] Deploying stdlib into /etc/puppetlabs/puppet/environments/master/modules
[R10K::Task::Environment::Deploy - NOTICE] Deploying environment garysawesomeenvironment
[R10K::Task::Puppetfile::Sync - INFO] Loading modules from Puppetfile into queue
[R10K::Task::Module::Sync - INFO] Deploying notifyme into /etc/puppetlabs/puppet/environments/garysawesomeenvironment/modules
[R10K::Task::Module::Sync - INFO] Deploying redis into /etc/puppetlabs/puppet/environments/garysawesomeenvironment/modules
[R10K::Task::Module::Sync - INFO] Deploying property_list_key into /etc/puppetlabs/puppet/environments/garysawesomeenvironment/modules
[R10K::Task::Module::Sync - INFO] Deploying wordpress into /etc/puppetlabs/puppet/environments/garysawesomeenvironment/modules
[R10K::Task::Module::Sync - INFO] Deploying r10k into /etc/puppetlabs/puppet/environments/garysawesomeenvironment/modules
[R10K::Task::Module::Sync - INFO] Deploying make into /etc/puppetlabs/puppet/environments/garysawesomeenvironment/modules
[R10K::Task::Module::Sync - INFO] Deploying concat into /etc/puppetlabs/puppet/environments/garysawesomeenvironment/modules
[R10K::Task::Module::Sync - INFO] Deploying vsftpd into /etc/puppetlabs/puppet/environments/garysawesomeenvironment/modules
[R10K::Task::Module::Sync - INFO] Deploying portage into /etc/puppetlabs/puppet/environments/garysawesomeenvironment/modules
[R10K::Task::Module::Sync - INFO] Deploying r10k into /etc/puppetlabs/puppet/environments/garysawesomeenvironment/modules
[R10K::Task::Module::Sync - INFO] Deploying inifile into /etc/puppetlabs/puppet/environments/garysawesomeenvironment/modules
[R10K::Task::Module::Sync - INFO] Deploying git into /etc/puppetlabs/puppet/environments/garysawesomeenvironment/modules
[R10K::Task::Module::Sync - INFO] Deploying vcsrepo into /etc/puppetlabs/puppet/environments/garysawesomeenvironment/modules
[R10K::Task::Module::Sync - INFO] Deploying firewall into /etc/puppetlabs/puppet/environments/garysawesomeenvironment/modules
[R10K::Task::Module::Sync - INFO] Deploying ruby into /etc/puppetlabs/puppet/environments/garysawesomeenvironment/modules
[R10K::Task::Module::Sync - INFO] Deploying mysql into /etc/puppetlabs/puppet/environments/garysawesomeenvironment/modules
[R10K::Task::Module::Sync - INFO] Deploying pe_gem into /etc/puppetlabs/puppet/environments/garysawesomeenvironment/modules
[R10K::Task::Module::Sync - INFO] Deploying apache into /etc/puppetlabs/puppet/environments/garysawesomeenvironment/modules
[R10K::Task::Module::Sync - INFO] Deploying stdlib into /etc/puppetlabs/puppet/environments/garysawesomeenvironment/modules
[R10K::Task::Environment::Deploy - NOTICE] Deploying environment development
[R10K::Task::Puppetfile::Sync - INFO] Loading modules from Puppetfile into queue
[R10K::Task::Module::Sync - INFO] Deploying r10k into /etc/puppetlabs/puppet/environments/development/modules
[R10K::Task::Module::Sync - INFO] Deploying property_list_key into /etc/puppetlabs/puppet/environments/development/modules
[R10K::Task::Module::Sync - INFO] Deploying wordpress into /etc/puppetlabs/puppet/environments/development/modules
[R10K::Task::Module::Sync - INFO] Deploying inifile into /etc/puppetlabs/puppet/environments/development/modules
[R10K::Task::Module::Sync - INFO] Deploying vsftpd into /etc/puppetlabs/puppet/environments/development/modules
[R10K::Task::Module::Sync - INFO] Deploying firewall into /etc/puppetlabs/puppet/environments/development/modules
[R10K::Task::Module::Sync - INFO] Deploying mysql into /etc/puppetlabs/puppet/environments/development/modules
[R10K::Task::Module::Sync - INFO] Deploying pe_gem into /etc/puppetlabs/puppet/environments/development/modules
[R10K::Task::Module::Sync - INFO] Deploying apache into /etc/puppetlabs/puppet/environments/development/modules
[R10K::Task::Module::Sync - INFO] Deploying stdlib into /etc/puppetlabs/puppet/environments/development/modules
[R10K::Task::Deployment::PurgeEnvironments - INFO] Purging stale environments from /etc/puppetlabs/puppet/environments
[R10K::Task::Deployment::PurgeEnvironments - INFO] Purging stale environments from /etc/puppetlabs/puppet/hiera

[root@master1 puppet]# ls /etc/puppetlabs/puppet/hiera
hiera_master  hiera_production  hiera_testing

[root@master1 puppet]# ls /etc/puppetlabs/puppet/environments/
development  garysawesomeenvironment  master  production
Great, so it configured R10k to clone the Hiera repository to
/etc/puppetlabs/puppet/hiera like we wanted it to, and you can see that with
prefixing enabled we have folders named “hiera_${branchname}”.
In Puppet, the magical connection that maps these subfolders to Puppet
environments is in puppet.conf, but for Hiera that’s the hiera.yaml file.
I’ve included that file in my Hiera repo, so let’s look at the
copy at /etc/puppetlabs/puppet/hiera/hiera_production/hiera.yaml:
The magical line is in the :datadir: setting of the :yaml: section; it
uses %{environment} to evaluate the environment variable set by Puppet and
set the path accordingly.
As of right now R10k is configured to clone Hiera data from a known repository
to /etc/puppetlabs/puppet/hiera, to create sub-folders based on branches to
that repository, and to tie data provided to each Puppet environment to the
respective subfolder of /etc/puppetlabs/puppet/hiera that matches the pattern
of “hiera_(environment_name)”.
The problem with hiera.yaml
You’ll notice that each subfolder to /etc/puppetlabs/puppet/hiera contains
its own copy of hiera.yaml. You’re probably drawing the conclusion that
each Puppet environment can read from its own hiera.yaml for Hiera configuration.
And you would be wrong.
For information on this bug, check out this link. You’ll see
that we provide a ‘hiera_config’ configuration option in Puppet that allows
you to specify the path to hiera.yaml, but Puppet loads that config as
singleton, which means that it’s read initially when the Puppet master process
starts up and it’s NOT environment-aware. The workaround is to use one
hiera.yaml for all environments on a Puppet master but to dynamically change
the :datadir: path according to the current environment (in the same way that
dynamic Puppet environments abuse ‘$environment’ in puppet.conf). You gain
the ability to have per-environment changes to Hiera data but lose the ability
to do things like using different hierarchies for different environments. As
of right now, if you want a different hierarchy then you’re going to need to
use a different master (or do some hacky things that I don’t even want to
BEGIN to approach in this article).
In summary – there will be a hiera.yaml per environment, but they will not
be consulted on a per-environment basis.
Workflow for per-environment Hiera data
Looking back on the previous post, you’ll see that the workflow
for updating Hiera data is identical to the workflow for updating code to your
Puppet environments. Namely, to create a new environment for testing Hiera
data, you will:
Push a branch to the Hiera repository and name it accordingly (remembering
that the name you choose will be a new environment).
Run R10k to synchronize the data down to the Puppet master
Add your node to that environment and test out the changes
For existing environments, simply push changes to that environment’s branch
and repeat the last two steps.
NOTE: Puppet environments and Hiera environments are linked – both tools use
the same ‘environment’ concept and so environment names MUST match for the data
to be shared (i.e. if you create an environment in Puppet called ‘yellow’, you
will need a Hiera environment called ‘yellow’ for that data).
This tight-coupling can cause issues, and will ultimately mean that certain
branches are longer-lived than others. It’s also the reason why I don’t use
defaults in my hiera() lookups inside Puppet manifests – I WANT the early
failure of a compilation error to alert me of something that needs fixed.
You will need to determine whether this tight-coupling is worth it for your
organization to tie your Hiera repository directly into R10k or to handle it
out-of-band.
R10k and monolithic module repositories
One of the first requirements you encounter when working with R10k is that your
component modules need to be stored in their own repositories. That convention
is still relatively new – it wasn’t so long ago that we were recommending that
modules be locked away in a giant repo. Why?
It’s easier to clone
The state of module reusability was poor
The main reason was that it was easier to put everything in one repo and clone
it out on all your Puppet master servers. This becomes insidious as your module
count rises and people start doing lovely things like committing large binaries
into modules, pulling in old versions of modules they find out on the web, and
the like. It also becomes an issue when you start needing to lock committers
out of specific directories due to sensitive data, and blah blah blah blah…
There are better posts out there justifying/villafying the choice of one or
multiple repositories, this section’s meant only to show you how to incorporate
a single repository containing multiple modules into your R10k workflow.
From the last post you’ll remember that the Puppetfile allows
you to tie a repository, and some version reference, to a directory using
R10k. Incorporating a monolithic repository starts with an entry in the
Puppetfile like so:
NOTE: That git repository doesn’t exist. I don’t HAVE a monolithic repo to
demonstrate, so I’ve chosen an arbitrary URI. Also note that you can use ANY
name you like after the mod syntax to name the resultant folder – it doesn’t
HAVE to mirror the URI of the repository.
Adding this entry to the Puppetfile would checkout that repository to
wherever all the other modules are checked out with a folder name of
‘my_big_module_repo’. Within that folder would most-likely (again, depending
on how you’ve laid out your repository) contain subfolders containing Puppet
modules. This entry gets the modules onto your Puppet master, but it doesn’t
make Puppet aware of their location. For that, we’re going to need to add an
entry to the ‘modulepath’ configuration item in puppet.conf
Inside /etc/puppetlabs/puppet/puppet.conf you should see a configuration item
called ‘modulepath’ that currently has a value of:
The modulepath itself works like a PATH environment variable in Linux – it’s
a priority-based lookup mechanism that Puppet uses to find modules. Currently,
Puppet will first look in /etc/puppetlabs/puppet/environments/$environment/modules
for a module. If a the module that Puppet was looking for was found, Puppet
will use it and not inspect the second path. If the module was not found at the
FIRST path, it will inspect the second path. Failing to find the module at the
second path results in a compilation error for Puppet. Using this to our
advantage, we can add the path to the monolithic repository checked-out by the
Puppetfile AFTER the path to where all the individual modules are checked-out.
This should look something like this:
Note: This assumes all modules are in the root of the monolithic repo. If
they’re in a subdirectory, you must adjust accordingly
That’s a huge line (and if you’re afraid of anything over 80 column-widths then
I’m sorry…and you should probably buy a new monitor…and the 80s are over),
but the gist is that we’re first going to look for modules checked out by R10k,
THEN we’re going to look for modules in our monolithic repo, then we’re going
to look in Puppet Enterprise’s vendored module directory, and finally, like I
said above, we’ll fail if we can’t find our module. This will allow you to KEEP
using your monolithic repository and also slowly cut modules inside that
monolithic repo over to their own repositories (since when they gain their own
repository, they will be located in a path that COMES before the monolithic
repo, and thus will be given priority).
Using MCollective to perform R10k synchronizations
This section is going to be much less specific than the rest because the piece
that does the ACTION is part of a module for R10k. As of the time
of this writing, this agent is in one state, but that could EASILY change. I
will defer to the module in question (and specifically its
README file) should you need specifics (or if my module is dated). What I CAN
tell you, however, is that the R10k module does come with a class
that will setup and configure both an MCollective agent for R10k and also a
helper application that should make doing R10k synchroniations on multiple
Puppet masters much easier than doing them by hand. First, you’ll need to
INSTALL the MCollective agent/application, and you can do that by pulling
down the module and its dependencies, and classifying all Puppet
masters with R10k enabled by doing the following:
1
includer10k::mcollective
Terribly difficult, huh? With that, both the MCollective agent and application
should be available to MCollective on that node. The way to trigger a
syncronization is to login to an account on a machine that has MCollective
client access (in Puppet Enterprise, this would be any Puppet master that’s
allowed the role, and then, specifically, the peadmin user…so doing a
su - peadmin should afford you access to that user), and perform the following
command:
1
mcor10kdeploy
This is where the README differs a bit, and the reason for that is because Finch
changed the syntax that R10k uses to synchronize and deploy modules to a Master.
The CURRENTLY accepted command (because, knowing Finch, that shit might change)
is r10k deploy environment -p, and the action to the MCollective agent that
EXECUTES that command is the ‘deploy’ action. The README refers to the
‘synchronize’ action, which executes the r10k synchronize command. This command
MAY STILL WORK, but it’s deprecated, and so it’s NOT recommended to be used.
Like I said before, this agent is subject to change (mainly do to R10k command
deprecation and maturation), so definitely refer to the README and the code
itself for more information (or
file issues and pull requests on the module repo directly).
Tying R10k to CI workflows
I spent a year doing some presales work for the Puppet Labs SE team, so I can
hand-wave and tapdance like a motherfucker. I’m going to need those skills for
this next section, because if you thought the previous section glossed over the
concepts pretty quickly and without much detail, then this section is going to
feel downright vaporous (is that a word? Fuck it; I’m handwaving – it’s
a word). I really debated whether to include the following sections in this
post because I don’t really give you much specific information; it’s all very
generic and full of “ideas” (though I do list some testing libraries below that
are helpful if you’ve never heard of them). Feel free to abandon ship and skip
to the FINAL section right now if you don’t want to hear about ‘ideas’.
For the record, I’m going to just pick and use the term “CI” when I’m referring
to the process of automating the testing and deployment of, in this case,
Puppet code. There have definitely been posts arging about which definition is
more appropriate, but, frankly, I’m just going to pick a term and go with it,
The issue at hand is that when you talk “CI” or “CD” or “Continuous (fill_in_the_blank)”, you’re
talking about a workflow that’s tailored to each organization (and sometimes
each DEPARTMENT of an organization). Sometimes places can agree on a specific
tool to assist them with this process (be it Jenkins, Hudson, Bamboo, or
whatever), but beyond that it’s anyone’s game.
Since we’re talking PUPPET code, though, you’re restricted to certain tasks
that will show up in any workflow…and THAT is what I want to talk about here.
To implement some sort of CI workflow means laying down a ‘pipeline’ that takes a
change of your Puppet code (a new module, a change to an existing module, some
Hiera data updates, whatever) from the developer’s/operations engineer’s workstation
right into production. The way we do this with R10k currently is to:
Make a change to an individual module
Commit/push those changes to the module’s remote repository
Create a test branch of the puppet_repository
Modify the Puppetfile and tie your module’s changes to this environment
Commit/push those changes to the puppet_repository
Perform an R10k synchronization
Test
Repeat steps 1-7 as necessary until shit works how you like it
Merge the changes in the test branch of the puppet_repository with the production branch
Perform an R10k synchronization
Watch code changes become active in your production environment
Of those steps, there’s arguably about 3 unique steps that could be automated:
R10k synchronizations
‘Testing’ (whatever that means)
Merging the changes in the test branch of the puppet_repository with the production branch
NOTE: As we get progressively-more-handwavey (also probably not a word, but fuck it – let’s
be thought leaders and CREATE IT), each one of these steps is going to be more
and more…generic. For example – to say “test your code” is a great idea, but,
seriously, defining how to do that could (and should) be multiple blog posts.
Laying down the pipeline
If I were building an automated workflow, the first thing I would do is
setup something like Jenkins and configure it to watch the puppet_repository
that contains the Puppetfile mapping all my modules and versions to Puppet
environments. On changes to this repository, we want Jenkins to perform an R10k
synchronization, run tests, and then, possibly, merge those changes into
production (depending on the quality of your tests and how ‘webscale’ you think
you are on that day).
R10k synchronizations
If you’re paying attention, we solved this problem in the previous section with
the R10k MCollective agent. Jenkins should be running on a machine that has the
ability to execute MCollective client commands (such as triggering
mco r10k deploy when necessary). You’ll want to tailor your calls from
Jenkins to only deploy environments it’s currently testing (remember in the
puppet_repository that topic branches map to Puppet environments, so this
is a per-branch action) as opposed to deploying ALL environments every time.
Also, if you’re buiding a pipeline, you might not want to do R10k
synchronizations on ALL of your Puppet Masters at this point. Why not? Well,
if your testing framework is good enough and has sufficient coverage that
you’re COMPLETELY trusting it to determine whether code is acceptable or not,
then this is just the FIRST step – making the code available to be tested. It’s
not passed tests yet, so pushing it out to all of your Puppet masters is a bit
wasteful. You’ll probably want to only synchronize with a single master that’s
been identified for testing (and a master that has the ability to spin up
fresh nodes, enforce the Puppet code on them, submit those nodes to a battery
of tests, and then tear them down when everything has been completed).
If you’re like the VAST majority of Puppet users out there that DON’T have a
completely automated testing framework that has such complete coverage that you
trust it to determine whether code changes are acceptable or not, then you’re
probably ‘testing’ changes manually. For these people, you’ll probably want to
synchronize code to whichever Puppet master(s) are suitable.
The cool thing about these scenarios is that MCollective is flexible enough
to handle this. MCollective has the ability to filter your nodes based on
things like available MCollective agents, Facter facts, Puppet classes, and
even things like the MD5 hashes of arbitrary files on the filesystem…so
however you want to restrict synchronization, you can do it with MCollective.
After all of that, the answer here is “Use MCollective to do R10k syncs/deploys.”
Testing
This section needs its own subset of blog posts. There are all kinds of tools
that will allow you to test all sorts of things about your Puppet code (from
basic syntax checking and linting, to integration tests that check for the
presence of resources in the catalog, to acceptance-level tests that check
the end-state of the system to make sure Puppet left it in a state that’s
acceptable). The most common tools for these types of tests are:
Unfortunately, the point of this section is NOT to walk you through setting up
one or more of those tools (I’d love to write those posts soon…), but rather
to make you aware of their presence and identify where they fit in our Pipeline.
Once you’ve synchronized/deployed code changes to a specific machine (or
subset of machines), the next step is to trigger tests.
Backing up the train a bit, certain kinds of ‘tests’ should be done WELL in
advance of this step. For example, if code changes don’t even pass basic syntax
checking and linting, they shouldn’t even MAKE it into your repository. Things
like pre-commit hooks will allow you to trigger syntactical checks and linting
before a commit is allowed. We’re assuming you’ve already set those up (and
if you’ve NOT, then you should probably do that RIGHT NOW).
Rather, in this section, we’re talking about doing some basic integration
smoke testing (i.e. running the rspec-puppet tests on all the modules to ensure
that what we EXPECT in the catalog is actually IN the catalog), moving into
acceptance level testing (i.e. spinning up pristine/clean nodes, actually
applying the Puppet code to the nodes, and then running things like Beaker
or Serverspec on the nodes to check the end-state of things like services, open
ports, configuration files, and whatever to ensure that Puppet ACTUALLY left
the system in a workable state), and then returning a “PASS” or
“FAIL” response to Jenkins (or whatever is controlling your pipeline).
These tests can be as thorough or as loose as is acceptable to you (obviously,
the goal is to automate ALL of your tests so you don’t have to manually check
ANY changes, but that’s the nerd-nirvana state where we’re all browsing the web
all day), but they should catch the most NOTORIOUS and OBVIOUS things FIRST.
Follow the same rules you did when you got started with Puppet – catch the
things that are easiest to catch and start building up your cache of “Total
Time Saved.”
Jenkins needs to be able to trigger these tests from wherever it’s running,
so your Jenkins box needs the ability to, say, spin up nodes in ESX, or
locally with something like Vagrant, or even cloud nodes in EC2 or GCE, then
TRIGGER the tests, and finally get a “PASS” or “FAIL” response back. The
HARDEST part here, by far, is that you have to define what level of testing
you’re going to implement, how you’re going to implement it, and devise
the actual process to perform the testing. Like I said before, there are other
blog posts that talk about this (and I hope to tackle this topic in the very
near future), so I’ll leave it to them for the moment.
To merge or not to merge
The final step for any test code is to determine whether it should be merged
into production or not. Like I said before, if your tests are sufficient and
are adequate at determining whether a change is ‘good’ or not, then you can
look at automating the process of merging those changes into production and
killing off the test branch (or, NOT merging those changes, and leaving the
branch open for more changes).
Automatically merging is scary for obvious reasons, but it’s also a good ‘test’
for your test coverage. Committing to a ‘merge upon success’ workflow takes
trust, and there’s absolutely no shame in leaving this step to a human,
to a change review board, or to some out-of-band process.
Use your illusion
These are the most common questions I get asked after the initial shock of R10k,
and its workflow, wears off. Understand that I do these posts NOT from a “Here’s
what you should absolutely be doing!” standpoint, but more from a “Here’s what’s
going on out there.” vantage. Every time I’m called on-site with a customer, I
evaluate:
The size and experience level of the team involved
The processes that the team must adhere to
The Puppet experience level of the team
The goals of the team
Frankly, after all those observations, sometimes I ABSOLUTELY come to the
conclusion that something like R10k is entirely-too-much process for
not-enough benefit. For those who are a fit, though, we go down the checklists
and tailor the workflow to the environment.
What more IS there on R10k?
I do have at least a couple of more posts in me on some specific issues I’ve
hit when consulting with companies using R10k, such as:
How best to use Hiera and R10k with Puppet ‘environments’ and internal, long-term ‘environments’
Better ideas on ‘what to branch and why’ with regard to component modules and the puppet_repository
To inherit or not to inherit with Roles
How to name things (note that I work for Puppet Labs, so I’m most likely very WRONG with this section)
Other random things I’ve noticed…
Also, I apologize if it’s been awhile since I’ve replied to a couple of
comments. I’m booked out 3 months in advance and things are pretty wild at
the moment, but I’m REALLY thankful of everyone who cares enough to drop a
note, and I hope I’m providing some good info you can actually use! Cheers!